CiviCRM 101: Using your online database (CiviCRM 4)
Please note: Your exact menu names, the look of the page, etc. will vary depending on customizations that have been made to your install, your theme, and what version you are using.
CiviCRM is a Customer Relationship Management database system. It works similar to Access or other such databases, except that this system is available online instead of residing on one person's computer.
This CRM allows multiple people to have access (if you choose to) via individual user names and passwords. It is also available anywhere you have internet access.
The benefit of a system like this is that multiple people can easily have access, duplication of information across multiple files is no longer an issue, and you can have access from anywhere with internet access - not just at the computer with the database.
Many campaigns and organizations find that they end up with multiple copies of their lists/databases/spreadsheets, each with different information. One person makes a copy so they can have one on their computer, they input information into that file, and now you have two different files. And the longer your organization has been around, the more such files you're likely to have.
This CRM allows you to import all the information from your spreadsheets and databases and store it in one, easy to access place. You can even export it into a file in case you need to take it somewhere without internet access.
Also, you can allow people to update their own information, if you choose.
Setting up CiviCRM can be difficult, as there are many settings that have to be done to ensure that your installation works. As such, it is recommended to get someone who knows CiviCRM to help you with this.
CiviCRM allows you to collect information, such as from volunteer and sign up forms, take online donations (when connected to a merchant account service), allow people to sign up for memberships, have paid events, and more. Future versions of the software will have additional features.
CiviCRM has also recently added a free how-to book and there is now a printed book as well.
CiviCRM's components
There are several parts to CiviCRM, including the base CiviCRM features, CiviMail, CiviContribute, CiviEvent, and CiviMember.
CiviCRM
CiviCRM allows you to collect, organize, and work with information on donors, customers, contributors, members, etc.
There are a number of default fields that come standard in CiviCRM, including first name, middle name, last name, street address, city, state, postal code, etc.
You also have the ability to create other fields, which can be a text line, text area (multiple lines), radio boxes (multiple choice where you can only select one), checkboxes (where you can select multiple items), etc. These additional fields will then be available on a person's contact record.
With CiviCRM, you can search through the records, edit people's records, and add new ones.
Because it is a relationship management database, you can also add relationships to people such as "child of", "spouse of", "employee of", etc.
CiviMail
The CiviMail system allows you to send out bulk emails to people in your database. You have the option of sending to everyone, to groups you have set up, etc.
The sending of emails is done through your web browser and includes an html and text version of the email. The system tracks how many emails are opened and/or forwarded, handles unsubscribes and more.
If you are running a newer version of CiviCRM 2.2+, it is now easier to use CiviMail on a shared hosting system. However, you must still follow the rules set forth by your host. Some hosts have very low limits for how many emails total can be sent from your domain per hour, which can make it difficult to use CiviCRM. We highly recommend checking with your web host before using CiviCRM, as you could block your ability to send emails from your personal account on the domain because you used your quota through CiviMail. Even worse, you may violate your host's terms of services and end up with your site deactivated.
You will also need someone with advanced CiviCRM skills to help you set this up so the appropriate cron scripts can be turned on so that emails are sent and unsubscribes/opt-out/tracking information is received.
CiviContribute
CiviContribute allows you to take donations online. It will collect any information you tell it to, which is great for candidates and political groups who need to collect specific information on donors in order to be in compliance with the law. You can also add honoree information, allow people to set up their own contribution pages for your cause, and more.
Currently, CiviCRM connects with a few merchant accounts for taking credit cards online: PayPal (website standard and pro), Authorize.net, PayJunction, Google Checkout, Moneris eSelect Plus, Elavon / Nova, WAY, PayJunction, PaymentExpress, and ClickAndPledge. As of right now, only Paypal is supported for recurring contributions. The community is working to raise the funds to be able to hire a developer to extend that ability to Authorize.net (payment processors are contributed parts of CiviCRM, not core, and as such are not supported by CiviCRM's developers). Google Checkout is limited in that only federal campaigns/political organizations are allowed to use it - they require a copy of your filing with the FEC in order to keep your account open.
CiviEvent
CiviEvent allows you to set up events where people can register. These can be paid or free events. Paid events use the same payment processors as listed above for CiviContribute.
Events can have a maximum number of sign-ups attached, allowing you to close registration once you reach the maximum number of attendees. People can also be added to waiting lists and then notified when space is available.
Multiple people can be registered at one time, making sign ups for families and such much easier.
There is currently not a way to attach workshops/breakouts to the event and allow people to choose their groups. This can be done via adding fields to CiviCRM and having those show on the registration form; however, it will not keep track of how many people are signed up for what, close items when they are full, etc. This is a feature that has been requested and may need funding to achieve.
CiviMember
CiviMember allows you to offer memberships - both paid and free. These memberships have a length of time attached to them (such as a year), and people receive renewal notices prior to their membership expiring.
This is great for non-profits and community groups that offer paid memberships as a way to fund their activities.
CiviPledge
CiviPledge allows people to pledge to donate a specific amount at a specific interval. It may be that they want to donate $15 a month every month for 6 months.
This system allows them to make their pledge, make the first contribution, and then send out reminder emails shortly before their next donation is due.
This does not automatically run those pledges - it only keeps track of them.
You will also need someone with advanced CiviCRM skills to help you set this up so the appropriate cron scripts can be turned on so that the pledge statuses will be updated and reminder emails sent.
CiviCase
CiviCase is for tracking and managing a sequence of interactions between people in your organization and contacts in CiviCRM. This allows you to track more complex interactions and communication processes than you can with only activities. With CiviCase you can link activities around a common case as well as indentify the people involved and their role.
Some examples include:
- Managing legislator-constituent interactions
- Non-profits helping their clients with issues
CiviReport
This allows you to create, run and schedule reports to be run based on the data in your database. These reports can be on things like contributions, activities, and more.
CiviReport comes with a variety of preconfigured reports and you can add your own reports as well. You can even turn some of them on so that they show up on your dashboard in CiviCRM, which allows you a quick look at what is going on in your database. For a campaign, for instance, I may have a listing showing who has endorsed the campaign and another that shows donations by month.
CiviEngage *new*
This allows you to use CiviCRM's core functions for non-profits and political groups for community organizing and civic engagement work. This is where you'll find tools for running canvasses and phone banks.
Roles, accounts, contacts, and memberships
When you are using both Drupal and CiviCRM, it can get a little confusing as to what each of the things relating to a person in your site/database means.
Role - Drupal - this is a category that is assigned to a person so that a set of permissions can be assigned to them. Examples include: admin, staff, and editor.
Account - Drupal - an account is what someone has if they have registered on your Drupal site with a username and password.
Contact - CiviCRM - this is a record within your database. It could be an individual (person) contact, organizational contact, or household contact. These are automatically created anytime someone creates an account on your site, fills out a CiviCRM form, donates, becomes a member, etc.
Membership - CiviCRM - this is for memberships within your organization. You can use a module to sync memberships and roles so that the membership can also control permissions over in Drupal.
Custom data - How do I add my own fields?
Custom data is used to add new fields to the database so that it meets the needs of your organization. It may be a text field, text area, checkboxes, yes/no, etc.
To add new fields, go to Administer >> Customize >> Custom data
Here you can create new data groups and then add custom fields to those groups. Once you have created the custom data fields, you will be able to use those inside profiles.
Adding and editing fields is very easy. Just choose the appropriate option - add a field or customize one already there - and then follow the options down the screen.
You can read more about custom data here and here.
Once you have added a custom field to a profile, editing the name inside custom data will not change it on the profile listing. You will need to go to the appropriate profile, edit the field, and reselect it from the drop down so that it picks up the new name.
Profiles - How do I create forms?
Profiles are what is used to build forms such as contribution pages, membership sign-ups, registration for your site, and more. They can be set up as standalone pages (create a profile page and then grab the standalone form code and put into a page) or can be used as part of one of CiviCRM's components, such as CiviContribute.
When it's part of one of the components, you add the profile as part of the set up of that page. It gives you the option to add up to two profiles to the page. I'd rather you have the option for more, but that is all it gives you.
When it's added as a standalone page, you first create the profile. Go to Administer >> Customize >> CiviCRM Profile
There you can create a new profile or add to one that is already there. There is a good amount of information on profiles here. There is also information on profiles here.
You can add fields that are standard to a profile as well as those you create yourself. It's pretty easy to do - just pick what kind of contact the field is assigned to (is it something like "first name" that would only be for an individual or an address which would be for all "contacts", for instance), choose your options - such as whether it is required - and then submit the page.
Once your profile is done, you can grab the html code to paste into a Drupal page. Just click on "more" to the right of the profile's name on the profile listing page. Then choose "html form snippet". This will give you all the html code you need to add this to a page. Please note: If you are using these snippets and then change the form, it can break the code you are using elsewhere since it does not automatically update your custom page.
You can change the label for a field in your profile without affecting the field's name anywhere else. Just edit it inside the profile. This can be handy if you need something more descriptive for the public but want the shorter name to be used within admin areas, such as a person's record. Changing it there is not universal - it only affects that profile.
Searching for a record
A simple search
This will search for a record based on name or email.
Go to CiviCRM in your site.
Click the "Search" menu and choose "find contacts".
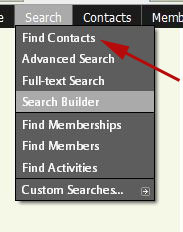
This will give you the simple search from for your database.

Input their name (if you collected it on your form) or email information into the search box. Then click search. You do not need to change the settings on any of the other drop down boxes. Note: You can leave the box empty and click search, which will bring up all records in your database.
After clicking search, you will get the search results page with a listing of all records that match your search terms.

(click for larger image)
On the search results page, click on the name of the person you want to add a membership to.
This will bring up the record for that person.
Advanced Search
This will allow you to search on more than just a person's name, such as memberships of a certain type, people who became members during a certain time, all records based on gender, etc.
Click on the Search menu at the top and then select "Advanced Search."
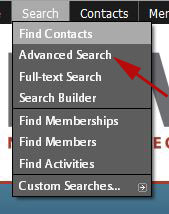
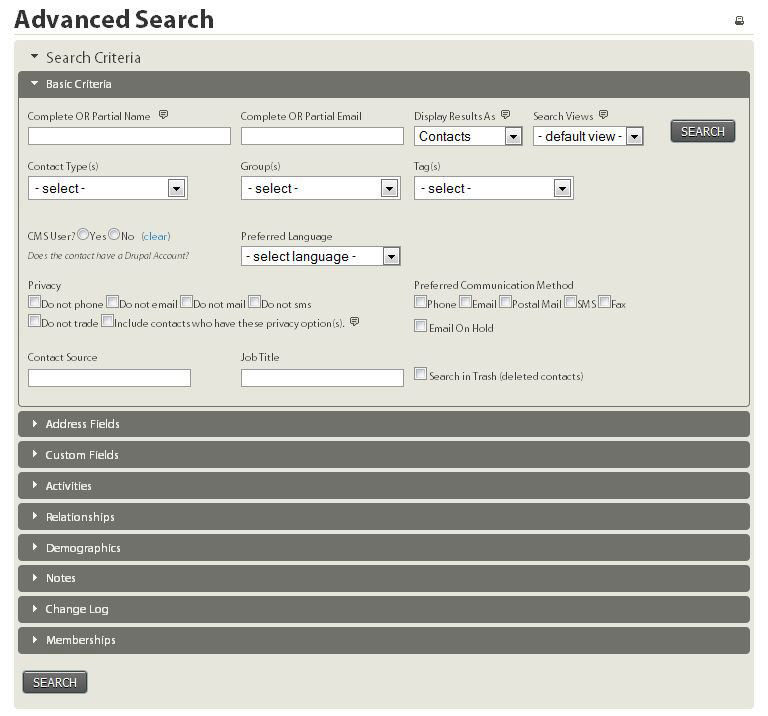
This will bring up the Advanced Search page, which gives you more options than the simple search page. Here you can search based on just about any field in a person's record as well as memberships between certain dates, contributions within certain dates, etc.
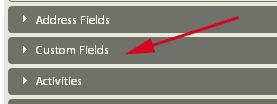
Just open up a collapsed area of fields and choose what you want to search on by clicking on the area's header. This will open/collapse areas, allowing you to search on a whole array of data.
Any fields you have added to the database beyond the standard fields will be listed under "Custom fields".
After clicking search, you will get the search results page with a listing of all records that match your search terms.
(click for larger image)
On the search results page, click on the name of the person you want to add a membership to.
This will bring up the record for that person.
Importing data
Unless you are a brand new organization starting out with no contacts whatsoever, chances are you have data that will need to be imported into CiviCRM. Doing so is very easy.
First step is cleaning your data - ensure that every record in the email column is indeed an email address, break out street address/city/state/zip/country into separate fields, etc. Ensuring you start with clean data will save you a lot of time later. If you don't know how to clean the data, find an employee or volunteer who can do it. We can also be contracted to help clean your data.
Once your data is cleaned and saved into a .csv file, it is ready for importing.
Go to Contacts » Import Contacts
Upload your file. Be certain to tell it you have included headers and select which date format matches your file.
On the next page you'll match the fields from your file to those in the database. It makes it easy as it tries to guess based on the header name, plus it shows you the first two records so you can check for yourself. There is a drop down for each field so you can choose the correct field to match to.
Once you're done, you can tell it to save the field mapping. This will mean that it will remember this mapping every time, which makes future imports quick and easy.
On the next page it will tell you if there are any errors with the data and give you a download for a file with error details.
Then you can import the records.
That's it.
I recommend doing this in smaller chunks - if you try importing 10,000 records with 50 fields each, you're probably going to crash the MySQL database and the import won't finish. I try not to do more than 500 records at a time unless the amount of data in each record is small.
Download information to Excel
CiviCRM makes it very easy to export information into Excel (or any other program that can handle csv files).
Go to the CiviCRM area of your site.
Click on the "Search" menu at the top.
Choose advanced search, as you will get the most options this way.
Choose what options you want to search upon.
Any custom fields you have added to your site will be listed down under a section entitled "Custom fields"
If your field isn't available there, then it has not been set to be searchable.
To make a field searchable:
Go to the "Administer" menu in CiviCRM.
Select "Customize"
Select "Custom Data"
Locate the data you want to make searchable. It will be located in one of the field groupings found on this page.
...Back to the search
Choose everything you want to search on and hit search at the bottom.
The next page will bring up all records that match your search terms.
Choose the radio button to select all the records.
From the drop down choose "Export Contacts" and then click "go".
On the next page you'll be given options regarding what to export. Primary fields are things that come standard with CiviCRM, such as name, address, email, and phone. You can also choose the fields yourself.
If you choose to select the fields yourself, you can "map" it so you can use this same list of fields again.
After you choose what fields to export, hit the button to continue and it will download the records into a csv file for you.
Deleting a record
To delete a record from the database, you will need to first locate the record. It is easiest to do this by searching the database (instructions can be found here).
After you get the listing of records that match your search query, select the record you want to delete.
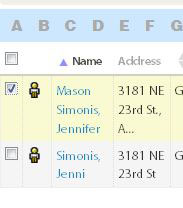
Choose your desired action from the "actions" drop down above the listing of names.
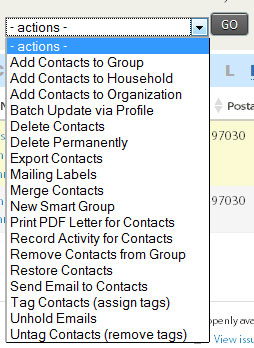
If you know you are not going to need to bring this record back, choose "Delete permanently" from the listing of actions. If you don't choose this option, the data in this record can still show up in places, such as listings of contacts you've pulled from the database.
Click the "go" button.
You will be asked to confirm this deletion.
Click the "Delete Contact(s)" button.
The contact is now removed, but the data remains in your database. If you want the record completely gone, cloose "Delete Permanently" instead.
CiviContribute: Contributions on your site
Log into your site. Once you do, a black menu bar should appear at the top of your screen.
Please note: this is only true on sites we create. If you're not a client of ours, this might not be true if Administration Menu isn't turned on for your site.
Click on CiviCRM on your menu.
This will change the top menu from the Drupal menu to the CiviCRM menu and will load the dashboard of CiviCRM.
Click Contributions in the menu and you will be given a drop down of options.
Dashboard: gives you information about how many donations have come through, average donation, etc.
New contribution: this allows you to hand input a donation. This is a good tool for those donations that comes in via mail, by check, etc. That allows you to keep all your donation information in one location.
Find contribution: this allows you to run a search for donations. This is a handy tool once you receive a number of donations and you need to be able to view (and/or export the data for uploading to SOS). You can run a search based on date, amount, and more.
Import contributions: If you've been keeping track of your offline donations in a spreadsheet or database, this will allow you to import them into CiviCRM.
Pledges: lets you manage pledges that come through the site.
New contribution page: allows you to create a new contribution page. This can be useful if you are running a specific donation campaign.
Manage contribution pages: manage the contribution pages that are already created. This is where you'd change text on the pages, the receipt, etc.
Personal campaign pages: You can view if anyone has set up their own page to raise money for you.
Premiums (thank you gifts): manage any thank you gifts you have attached to certain donation amounts.
New price set: set up a price set that can be used multiple times.
Manage price sets: edit the price sets you've created.
CiviContribute: Create a new contribution page
Adding a new contribution page on your site is pretty easy. It's all broken up into several pages and you just go through each page and input the data that it asks for.
Go to Contributions >> New Contribution Page
On the first page you'll put in the basics - title, what type of contribution this is, what campaign to associate it with ( a non-profit, for instance, may be running a campaign on breast cancer at the same time as one on leukemia), the intro message, footer message, goal amount, start and end date, whether or not to have an honoree section, and whether the page is active.
Once you fill everything out, click "Continue" to go to the next page.
The next page is the Contribution Amounts information. It will ask whether to execute real-time monetary transactions, currency, payment processor to use, if people can pay later or pledge amounts, what fixed contribution options there are, whether people can put in their own amount, etc.
Once you're done, click "Save". At this point, that is all that is required for you to put in. However, you'll likely need at least the Profiles page so that you can collect information on the donor, such as their name and address.
You can click each of the tabs at the top of the contribution page set up to enter the rest of the information.

Memberships - allows you to make this contribution page serve as a membership sign-up.
Receipt - text for the receipt, whether an email receipt should go out, etc.
Tell a friend - will there be an automated way for people to tell others about this contribution page?
Profiles - what two profiles (if any) should be included on the page? I always include the Name and Address one. For political contributions, the bottom one may be fields collecting data required by the state for reporting purposes, for instance.
Premiums - are you giving out a gift if people donate at certain levels - like PBS does in its membership drives.
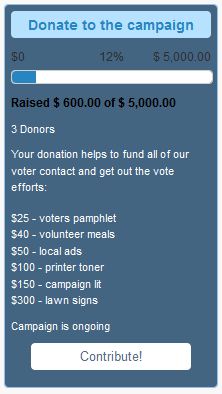
Widgets - do you want to create a widget that auto-updates with information on your goal amount and how close you are to that goal?You can even customize the colors and fonts to match those used on your site. Once you set all the options, CiviCRM will give you the code to use. You can use this widget anywhere you can paste in web code.
Personal Campaigns - do you want people to be able to create their own page to raise funds for your cause? This would allow them to track how much their friends, family members, etc. have given because of their recommendation. Pages have to be approved before they are live.
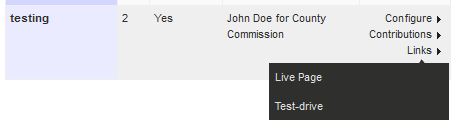
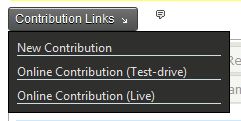
Once you're done creating the page, you can go back to Contribution » Manage Contribution Pages to get the link for the live contribution page. Just click on "Links" to the right of the page you need the link for and you'll get a pop-up with the links for the live and test pages.
You can also enter transactions manually - such as those that come in by mail - so that all your contribution data is in one place.
Go to Contribution » Manage Contribution Pages and click "configure".
On the next page, click "Contribution Links" towards the top of the main content area. A pop-up will give you links to creating a new contribution page as well as the same test and live page links you found on the step above.
CiviContribute: Entering contributions manually or by import
Keeping all your contribution data in one place is a good idea, as then you can quickly tell how much money a campaign has brought in without looking at multiple places. Backups are always a good idea, but you should have one main source for all your data.
If you're using CiviCRM to collect online donations, it makes sense to house all your offline donations there as well. The database has a lot of features for running reports and looking at data, and exporting out of the database to Excel or other programs is easy to do.
That means you're going to need to input all those offline transactions into CiviCRM. You have two options - manually entering each one or importing them. Some organizations find it easy to record all the offline transactions in Excel and then do batch imports of multiple donations at once. Others like to input them into CiviCRM as soon as they arrive. The choice is yours.
Entering one by one
Go to Contribution » Manage Contribution Pages and click "configure" next to the contribution page you want to attribute these donations to.
On the next page, click "Contribution Links" towards the top of the main content area. A pop-up will give you links to creating a new contribution. Click "New Contribution".

On the next page you'll input all the data regarding the donation. You can search to see if the donor is already in your database, or add them as a new contact if they are not.
You can even choose to have a receipt sent out once you suvbmit this offline donation. This is another great reason for keeping your offline donations in here as well - it can send out the email receipts, which can save you a lot of time.
Expand the "Additional Details" information area and make certain the correct contribution page is selected for this donation. This ensures the donation is categorized and accounted for properly. This is especially important when you have multiple donation funds that have to be tracked separately.
You can even give "soft credit" for the donation to someone. This is for when a supporter has a personal campaign page, but they have some donors that would prefer to do a donation in person, by mail, or over the phone. This allows you to still credit the donation to their personal campaign page, which counts towards their goal.
Importing donations
Go to Contributions » Import Contributions
You'll need your data in a .csv file. Most spreadsheet and other similar software can save in this format. Make certain your headers are included, as this will make matching data to CiviCRM easier.
Upload your file. Be certain to tell it you have included headers and select which date format matches your file.
On the next page you'll match the fields from your file to those in the database. It makes it easy as it tries to guess based on the header name, plus it shows you the first two records so you can check for yourself. There is a drop down for each field so you can choose the correct field to match to.
Once you're done, you can tell it to save the field mapping. This will mean that it will remember this mapping every time, which makes future imports quick and easy.
On the next page it will tell you if there are any errors with the data and give you a download for a file with error details.
Then you can import the records.
CiviContribute: Download contribution information
Log into your web site.
Hover over the "CiviCRM" link at the top of the page in the black menu bar.
Click on CiviContribute on the drop down that appears.
This will give you the most recent contributions that were attempted on the site.
Scroll to the bottom of the listing and click Find More Contributions.
If you don't see this at the bottom, then go up to the menu at the top of the page. Hover over CiviCRM, go down to CiviContribute, and choose Find Contributions on the menu.
Here you can set the items you want to search upon. Once you do your first download, you'll likely want to use the date function so that you don't have to download all the transactions every time.
This will bring up the entire list of contributions that meet your specifications.
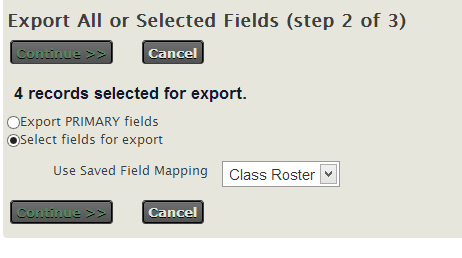
Next to "Select Records" choose all records.
Just below that under the More Actions drop down, choose export. Hit Go.
Your first time to do this:
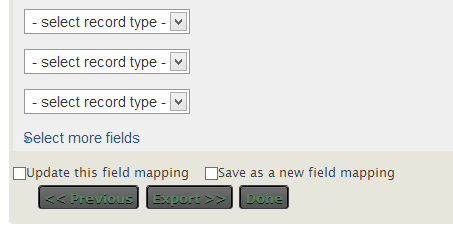
The first time you do this, you'll need to select "Select fields for export." Then on the next page you'll have to choose your fields. Name, address, and the like will be listed under Individual. Contribution date, amounts, etc. will be listed under Contribute.
Click Save Field Mapping.
Give it a name and description.
Click Export to export the file.
You'll get a .csv file that can be opened in Excel or other spreadsheet software.
Be sure to come back to your web browser and select Done so that your mapping will be saved.
Exports with a mapping:
Choose Use Saved Field Mapping. Choose Contribute. Hit Continue.
This will show you the fields that are being exported.
Click the Export button.
You'll get a .csv file that can be opened in Excel or other spreadsheet software.
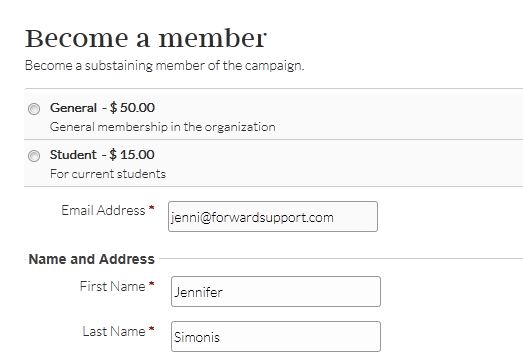
CiviMember: Membership Pages
Membership pages work very similar to contribution pages, except that you will need to add details regarding the membership - types, price, length, is the membership period rolling or fixed, etc.
It's best to review the creating contribution page, as it is the exact same process, with the addition of data being added to the memberships tab.
Go to Contacts » New Organization
You will create an organizational record for your organization. This will be needed later.
Once you have created your organization's record, go to Administer » CiviMember » Membership Types
Here you will input the details regarding the membership types for your organization:
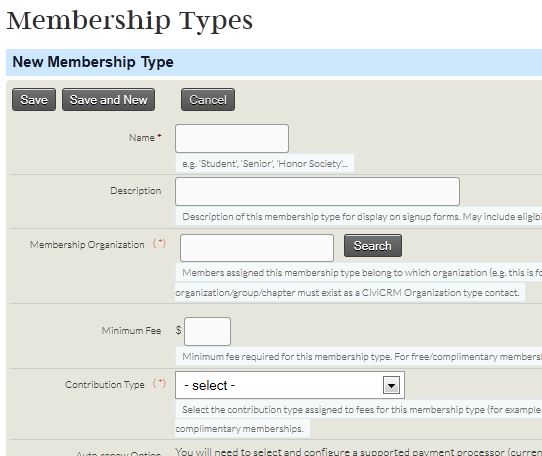
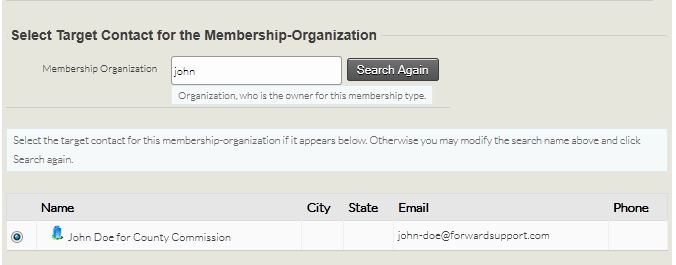
Input all the details requested on the page. The "Membership Organization" is the organization this membership belongs to - most likely your organization. This is required, which is why we created your organization's record at the beginning. Input part of your organization's name and hit search. Select your organization from the list that pops up below:
You have the option to set the membership period to be either rolling or fixed. If someone joins in June of the current year, does their membership end at the end of the year (fixed) or the same time next year (rolling)?
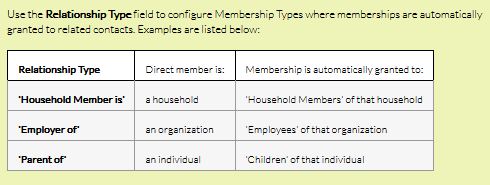
Relation types are used for a couple of things. If you want to be able to have all people associated with an organization become members once one person within the organization has joined, you would use this. The feature is also used for things like household or family memberships so that each subsequent person in the household who registers is automatically added to the household/family membership.
Once you have filled out the page, submit it. Repeat for all membership types that need to be added.
Now we'll go into the process that is like adding a contribution page.
Follow the steps for adding a contribution page. The main difference will be that we will also add data to the memberships tab and that we will select "membership dues" under "contribution type" on the front page.
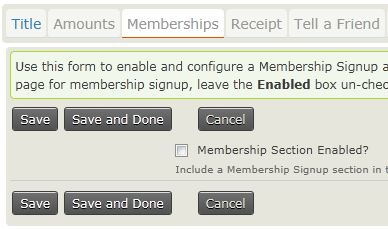
Click on the memberships tab. Click the checkbox to enable the membership section. When you click it, the page should automatically load the membership section.
Fill out the page.
Then fill out any of the other tabs that you want to add information to, as explained on the creating contribution page.
Once you're done, you will have a page similar to a contribution page, except that people will be selecting membership types instead of donating (although you can turn on donation abilities so that people can join and donate at the same time):
Giving permissions based on membership
You also have the ability to assign permissions within your site based on the membership a person has within your organization.
First, you'll need to set up roles and permissions within Drupal. This is done under People » Permission » Roles and People » Permission » Permissions
You may also want to install modules to allow you to make certain content viewable/editable to certain roles. This is a more advanced feature and not described here.
You'll need to go to your modules page in order to create the sync between your Drupal roles and the CiviCRM memberships. Turn on CiviMember Roles Sync.
Note: this sync is one way - if a membership is not assigned to a person in CiviCRM, you cannot assign the associated role manually within Drupal. As soon as the sync runs, the role will be removed in Drupal. You must add the membership in CiviCRM and the role will be added by the sync to the Drupal account.
Once this module is turned on, you'll need to go to the configuration page for the module. Depending on your setup, it could be in one of two places:
Configuration » System » CiviCRM » CiviMember Roles Sync or Configuration » CiviCRM » CiviMember Roles Sync
Here you will add the sync rules regarding which membership(s) in CiviCRM match to which Drupal role(s). You can also do a manual sync through this area, which runs through and syncs up everything. I have found that doing this occasionally is a good thing, as not all servers support the automatic syncing and not everyone understands they need to log out and log back in for their role to be added.
Once this is set up, roles (with associated permissions) will be added to people's accounts after they become members.
CiviMember: Adding a membership to a record
Adding a membership to a record is fairly straightforward.
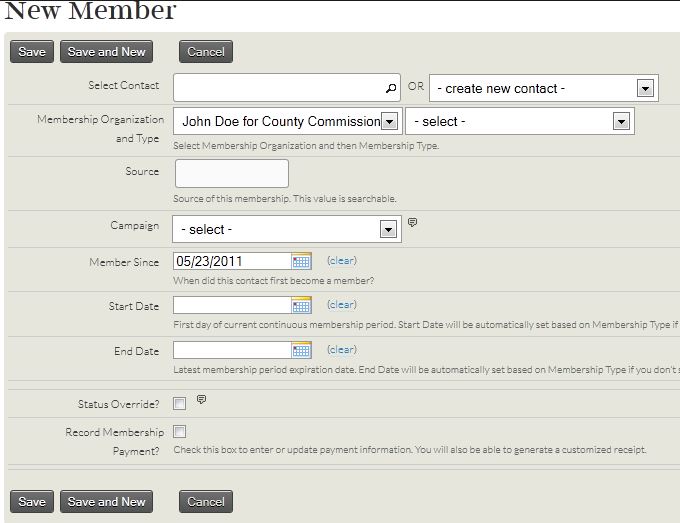
While in CiviCRM, go to Membership » New Membership
You can either search for a person (if they are already in your database) or create a new record.
From there, you will just fill out the page and then submit it to add the membership.
CiviMember: Remove a membership type from a record
If you have someone who has already gone through the process of registering for an account on your site, a record will automatically be added inside CiviCRM. Inside it at a minimum will be their email address. If you have attached other CiviCRM profile fields to your Drupal registration, those will be in their CiviCRM record as well.
Now how do you remove a membership to a record inside CiviCRM?
Go to CiviCRM in your site.
Click the "Search" menu and choose "find contacts". This will give you the simple search from for your database.
Input their name (if you collected it on your form) or email information into the search box. Then click search. You do not need to change the settings on any of the other drop down boxes. Note: You can leave the box empty and click search, which will bring up all records in your database.
On the search results page click on the name of the person you want to remove a membership from.
This will bring up the record for that person.
Note: If you aren't taking contributions and have replaced the word "contribution" site-wide with the word "membership", you may have two tabs that say "memberships". When we talk about the "Memberships" tab, we mean the second one.
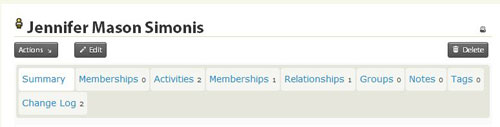
Click the "Memberships" tab.
This will bring up all membership information for this record.
There will be an area that says "active memberships". This is all the active memberships for this record.
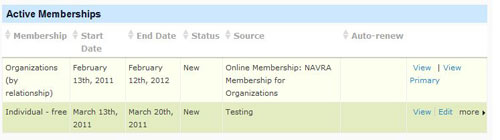
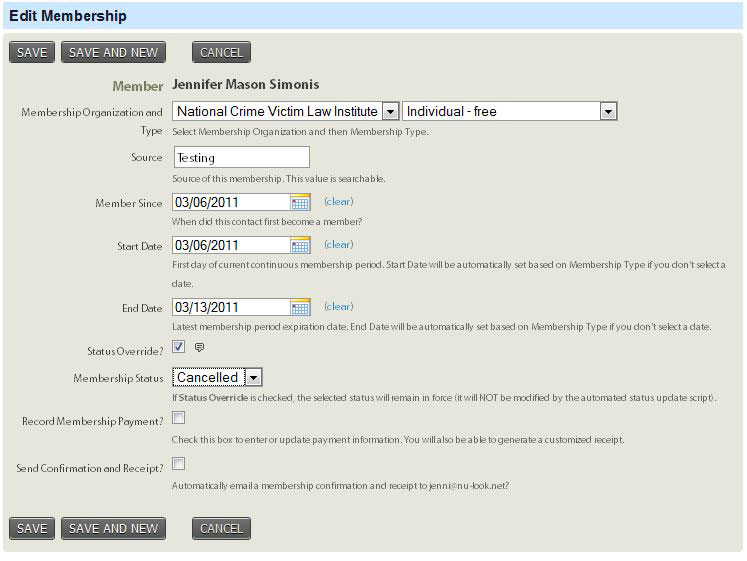
Click the "edit" link on the right side of the record. This will take you to the membership record.
(click for larger image)
Input today's date as the end date for the membership.
Click the checkbox for "status override". This will let you cancel the membership.
Choose cancelled from the listing.
Click the save button.
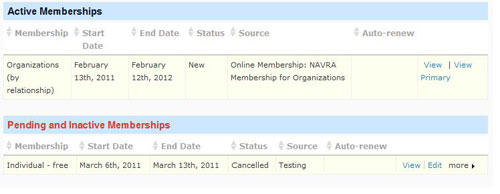
This membership has now been cancelled.
If you have permissions on your Drupal site that are assigned based on Memberships, you may want to manually sync the Drupal and CiviCRM data so the permissions are removed immediately. Otherwise on most sites it will not happen until the person logs out and then logs back into the site.
To manually sync everything, go back to your Drupal menu. You can do this by clicking the "Home" menu item and choosing "Drupal menu".
Under "Site Configuration" choose "CiviMember Roles Sync". Then choose "Manually Synchronize".
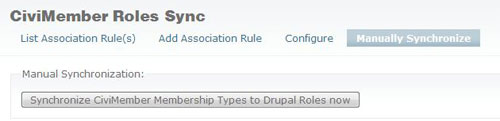
By clicking the button on this page, any changes you made regarding membership in CiviCRM will be synced to roles and permissions on your Drupal site. You can run this anytime you make changes or you suspect that the automated sync has not run.
CiviCampaign: Phonebanking
Doing online phonebanks with CiviCRM is fairly easy. This will allow you to check voters out to a volunteer and they can they do the phone calls from any location where they have internet access.
First you have to set up your campaign in CiviCRM.
Go to Campaigns » New Campaign
Fill out the page. Since the phone bank could be financial in nature - such as calling people for membership pledges - you can even put in a goal dollar amount to be raised.
Once the page is filled out, submit the page.
Go to Campaigns » New Survey
Input the details for this survey (what your volunteers will be asking on the phone). Be certain to set up result options for your volunteer so they can mark down the results of the phone calls, such as:
Will you support John Doe for County Commissioner?
1 - supports John Doe
2 - leaning towards John Doe
3 - undecided
4 - leaning towards other candidate
5 - supports other candidate
Then all the volunteer has to do is check one of those options and the campaign can quickly pull a report to see the results of the phone bank.
I also tend to create a custom field and custom profile (Administer » Customize » Custom Data and Administer » Customize » CiviCRM Profile) so that I have a key to show whether the person was reachable. It looks something like this (set up as radio buttons):
Results Key:
NA: Busy/NA/Not at home
WN: wrong number
DX: disconnected
HO: hostile
LM: left a message
LG: language other than English
RF: refused
DC: deceased
Be certain to list all of these keys in the instructions area as well as any script you want your volunteers to use. There is a current glitch in CiviCRM 4.0.1 where this field does not show as a html field. You may need a patch done to the software to turn this into a html-ready field. If you are on our server, we have already located and fixed this glitch.
Then set how many voters a person can check out at a time and when they will automatically be released back to the available pool of voters. This helps to keep voters from not being contacted because the volunteer never got around to it. It also keeps a volunteer from being able to check out the entire database of voters all at once.
Note: the automated release of voters takes a few advanced steps to set up a script that runs periodically.
Once you are finished filling in the details, submit the page.
The phonebank is now ready for use.
Volunteers will need an account on your site in order to be able to log in and access their voters. It is probably easiest if you have voters already assigned to volunteers unless you give them clear instructions on how to pull the correct database list to contact.
Reserving voters
To reserve voters for a volunteer, go to Campaigns » Reserve Respondents
You can now choose which script, interviewer, subset of your database, etc. This will assign those voters to the volunteer (or to yourself). I recommend that whenever you import/add records to your database that will be contacted via this system, assign them to a group up-front. For instance, I may import 3000 records for voters in my area. When I import them, I tell CiviCRM to add them to a group called "voters". Now I know that these records should be contacted by the campaign.
Now all you have to do is choose the group "voters" on the "reserve respondents" page and you'll narrow down the contacts available for phone calls.
CiviEvent - Creating events
CiviEvent is the module inside CiviCRM that allows you to do paid and free event signups. Using this module, you can have people RSVP for events, purchase paid tickets, and more. You can collect information on every attendee - such as would be needed for a convention or conference - or you can just collect information on the person purchasing/RSVPing and how many of each ticket/option they would like to purchase.
To add an event, click on the CiviCRM menu item at the top of the page. This will switch out your menu from the Drupal menu to the CiviCRM menu.
![]()
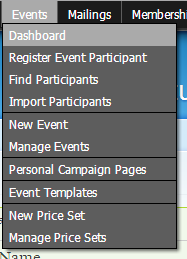
Click on the "Events" menu item. If you site has been customized, this menu title may have been changed to something similar, such as Conferences, Workshops, or Trainings.
This will bring up the menu options for events.
Here are two examples of what your menu might look like. Note how the one on the left has been customized to replace the word "event" with "training".
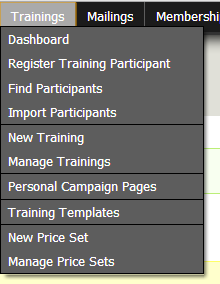
If you regularly hold events that would need similar settings, I'd recommend creating a template. The steps are the same as if you were creating an event, it just creates a template which you can use over and over.
If you want to sell tickets for an event, but only need to capture information on the person doing the RSVP or purchase, you can use price sets. This allows you to set the price level(s) for your event - such as General Admission, Student, and VIP - and sell multiple tickets to one person without the need to collect information on every guest.
To create a new event, click "Manage Events".
Click "Add Event".
At this point, you'll be taken through a series of tabs where you can input all the information you have for your event. Only the first two tabs are required. Once you finish those two, you can click on the remaining tabs and input any additional information you would like to add.
On the Online Registration tab is where you will tell the system what information you want to collect from people. You'll add custom fields - such as meal type - in the administrative interface and then add them (and fields that come standard like name and address) to a profile. Information on how to do this can be found at the links provided above.
Once you input all your data and save the event, you'll be given the "live link" to be used with the public.
CiviEvent - Finding participants, view/edit their record
Once you've created an event, it is likely you will need to find a list of all the participants in your event. To do that, go to the Event menu and click on "Find Participants"
This brings up a search form where you can search on a number of parameters. If you just want to look up one event, start typing its name in the Event Name field and it will automatically pull up any event(s) that match that name. Click on the event name in the drop down.

Click Search.
If there is anyone signed up for this event, you will get a listing on the next page. Otherwise the search page will reload and tell you that no one has signed up for that event.

On this page you can see the person's name, the event, what fee level they were at, the amount, and more. You can also see what their status is.
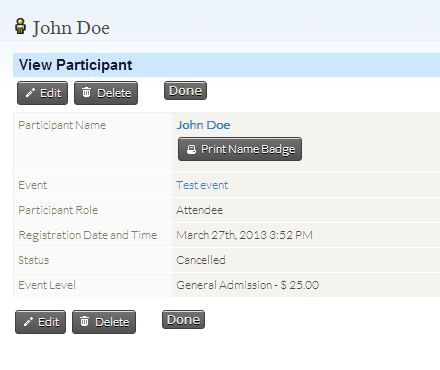
View a participant's record
If you want to view their record for this event, click on "View" on the right side.
Edit a participant's record
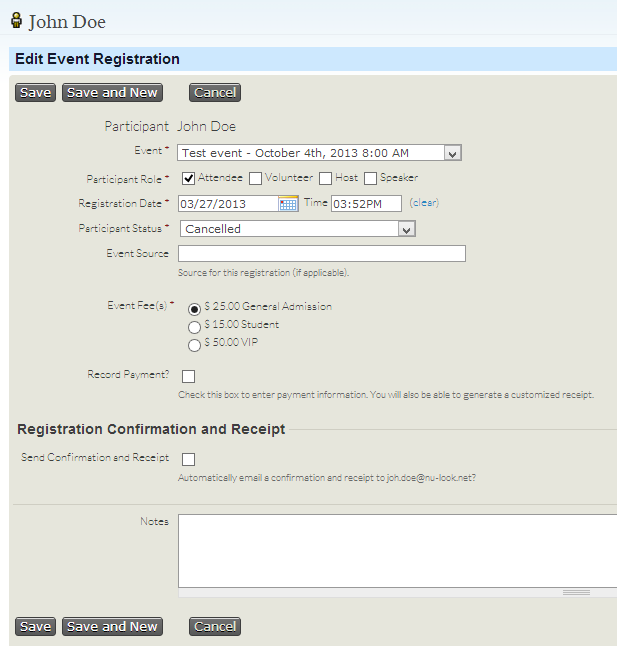
If you need to edit their record, just click "Edit" on the right side on the search listing (or click the "Edit" button if you are viewing their record).
This will bring up a page to edit their event record. This is handy if you need to input that a payment has been made offline or that a person has cancelled
Exporting information
You can also export the records to a file that can be opened in other programs such as Excel or imported into another database. Just select the records you want to export and then choose export from the list of options under the "- actions -" drop down. From there you can either choose the default fields (name, address, etc.) or you can choose the fields yourself. Most often you will choose the fields yourself since you will want to export custom fields related to the event.
More information on exporting can be found here.
CiviEvent - Exporting records
Exporting is really handy for creating documents with your data or for importing into another system or database.
Run a search for participants.
Select the participants you want to export. You can choose to select all records by either choosing All x records ("All 4 records" in the below example) at the top of the list or the checkbox that is above the listing. You can also click the checkbox next to individual records to select them.
From the drop down for actions, choose the option to export.

Click Go
On the next page you'll be asked what fields you want to export. Chances are you want to select the fields. If you have previously saved a mapping, they will also be listed for you to choose from.
Click Continue
If you need to select which fields you want
On the next page you will go through and select which fields you want to export.
The record types you'll probably use the most are either the Individual Record Type (name, address, phone, email, fields you've added about a person, etc.) and Participant (event they signed up for, how much they paid, etc.).
Once you choose a record type, then you are given a list of the fields available. FYI: For a quick way to get first and last name, choose "Display Name"

If this is an export you're going to do more than once, I recommend clicking the checkbox at the bottom that allows you to save the mapping. You'll then be asked for a name and optional description. This will save you from having to choose the fields every time.
Once you're done adding fields, click the export button at the bottom. This will download a .csv file that you can open in any spreadsheet program and can be used to do mail merge inside word processing programs.
If you are using a field mapping
Verify the fields you want are listed.
Once you are done, click the export button at the bottom. This will download a .csv file that you can open in any spreadsheet program and can be used to do mail merge inside word processing programs.
CiviEvent - Add Participants
You may find that you need to add participants to an event, such as those who sign up on a paper form or via fax. This is pretty easy to do.
Go to the Event menu and select Register Event Participant

This is very similar to the edit record that we looked at on the Find Participants how to, except that now we are adding a person.
You can choose to either add the event to someone already in your database or to create a new record. The new record pop-up will ask for the person's name and email. After you've added them and their event, you can go into their record and add more details.
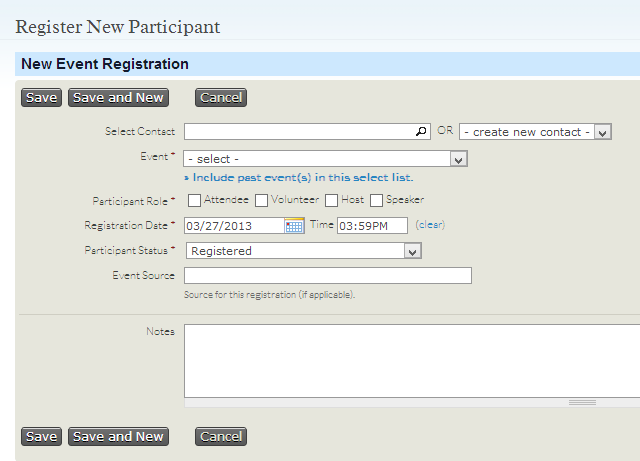
You can also input volunteers, hosts, and speakers this way so that you can have them in your event participant register.
CiviEvent - Reports
In addition to the search feature, there are also a number of pre-configured reports under the Reports menu that you can use to give you information about your events. You can also create custom reports. These reports are a great way to get a quick look at your event's status.
Your reports menu should look something like this:
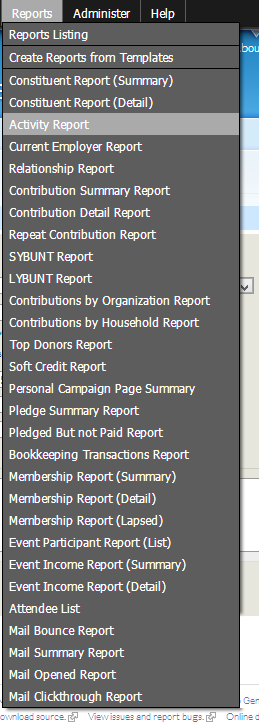
There are three pre-configured reports for working with your events.
When you open them up, they will show you information on all of your events. However, you can expand the areas at the top and narrow the report down to just one event (or filter on other criteria).
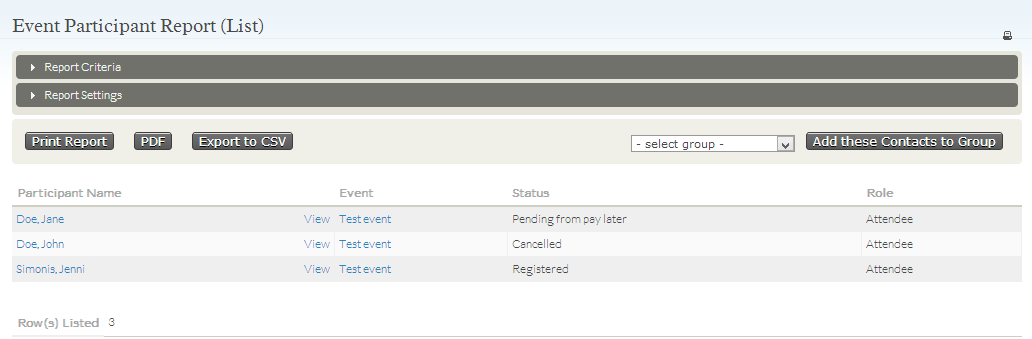
Event Participant Report
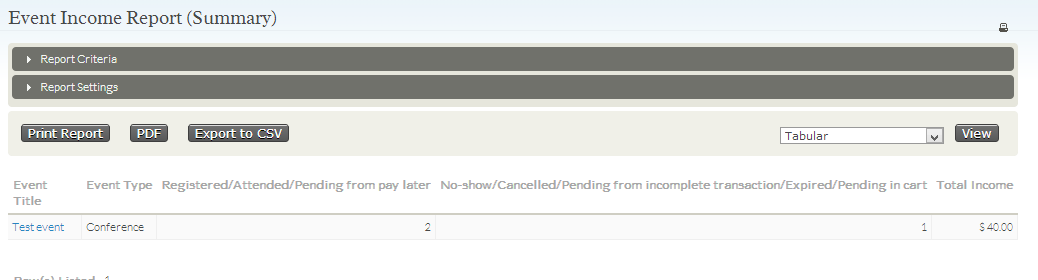
Event Income Report - Summary
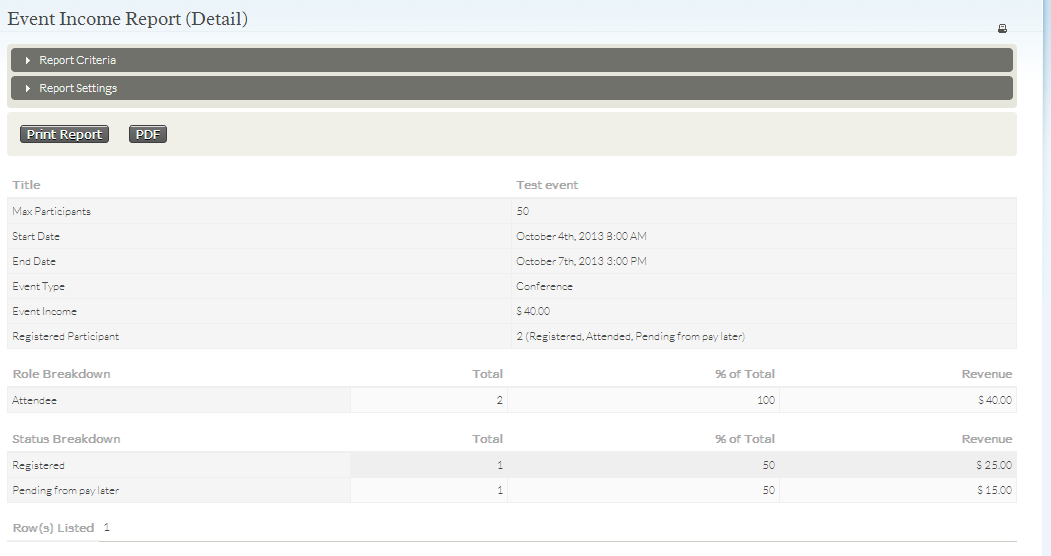
Event Income Report - Details
CiviMail: Creating your email
Creating your email
Go to Mailings » New Mailing
Title the mailing. Optionally choose which campaign this is in regards to.
Add your mailing list to the recipients.

Click next.
Choose your tracking and visibility options.
Click next.
If you have multiple from email addresses set up, choose which one to send from. If you have only one, it is chosen by default.
Input the subject for the email.
You can then choose to input your content on the screen or import it. Just remember that html is emails is VERY simple as compared to web pages. You are very limited in what html will show in an email. I highly recommend creating your email and then sending a test to yourself to various emails (Gmail, Hotmail, one checked in Outlook, etc.) to ensure your coding works. Tables can be used; however, they don't show in the WYSIWYG editor by default. We have it turned on for our setups; however, it does not come like that in a standard install.
You have the option of inputting both a html email as well as a plain text email.
Underneath the plain-text email option (collapsed by default) is a checkbox that will allow you to save this email as a template. Then you can utilize what you create here for other emails.
Ensure the correct header and footer are chosen (if applicable).
Click next.
On this page you can send test emails. You can send it directly to an email address or to a mail list group you have created just with test recipients in it.
You can also expand the preview area and see what the email should look like.
If everything is set up right on your server, the email should be received within a few minutes.
My test email in my webmail account:

If you want to make changes, I recommend clicking "Save and Continue Later" first to ensure your mailing is saved.
This will then take you to the Draft Mailings page where you can click "Continue" to work with the email again.
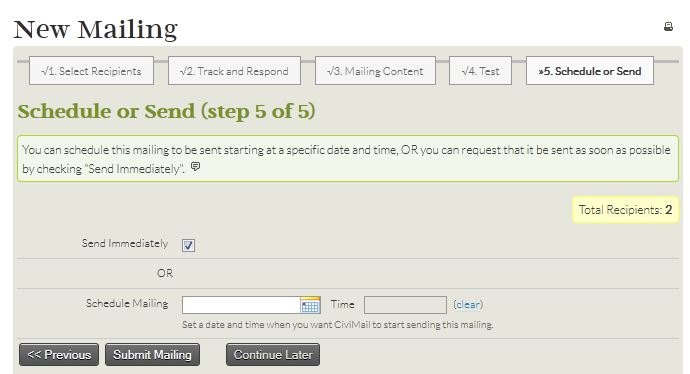
CiviMail: Sending your email
Sending the email
On the last page you can choose to either send immediately or to schedule it for a later time. Choose whichever is appropriate.
Note: A script must run to actually send the emails. You can call it manually be going to http://example.org/civicrm/mailing/queue&reset=1 where example.com is your domain. An automatic script (cron) can also be set up to run periodically.
Before sending, you will want to check with your web host to ensure they do not have limits set as to how many emails you can send an hour. You don't want your account to be suspended because you broke this rule.
CiviMail: Setting up bulk email
CiviCRM includes the ability to send bulk email through the system, such as e-newsletters and e-blasts. Not all servers support this feature since sending large numbers of individualized emails can be server intensive. Our server is specially configured to be able to run CiviCRM; however, that is not the case of most shared hosting accounts. I have found very few shared hosting accounts where CiviCRM can work and is allowed to work.
CiviMail uses the data stored within your database to send emails out to specified people. I typically add a group (or groups) that are specific to my email list(s). This allows me to quickly specify which subset of people I want to send the email to. These lists are filled with people who either signed up on a sign-in sheet (or other printed document) that gave us permission to send emails or specifically checked yes that they wanted to receive emails on a subscription page on our site. We never just blanket e-blast everyone in our database. This is spamming and can get you blocked by some ISPs.
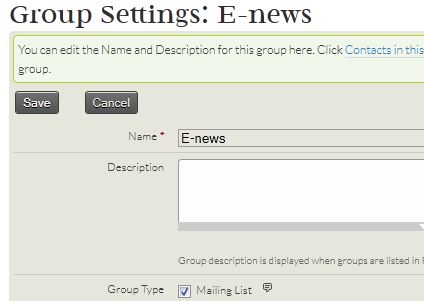
Make certain when you create the group that you click on the checkbox to make it a mailing listl. If you forgot to do this, go back and edit the group.
Setting up CiviMail
There are a few setup steps you will need to take before CiviMail will work.
Go to Administer » Configure » Global Settings » Outbound Email
Input your settings for emails sent through CiviCRM. You can even click to test to ensure the settings are correct.
Go to Administer » Configure » From Email Address (also found under Administer » CiviMail » From Email Address)
Click "add from email address" and input the sender name and email address. This will show on all outbound emails from CiviCRM.
Go to Administer » CiviMail » Mail accounts
Here you will give the information on the email account(s) used by CiviMail. I usually set up one email account in my web hosting account that is only used for CiviCRM bounce processing (unsubscribes, bad emails, etc.). This email account is contacted by CiviMail and the software handles the subsequent actions.
From the CiviCRM guide:
"CiviCRM handles bounces as follow: for each email sent, a new unique "invisible" sender address is created using the variable envelope return path (VERP). When CiviCRM receives a bounce, it looks at the invisible sender address to decide which email bounced. Contacts will be marked as on hold when their email bounces. Further messages to those addresses won't be sent."
Note: A script will have to be set up to run this automatic processing. We can help you with this or you can read more about it here.
Required information
There are a few bits of data that have to be included in your email for them to be sent out - domain information, unsubscribe information, etc. This is required by law.
The best thing to do is to include this in your footer so that it is automatically added to every email.
Go to Mailings » Headers, Footers, and Automated Messages
Click to edit the "Mailing Footer".
CiviCRM now includes the tokens already there for you - no need to do it yourself. However, there is text there stating this is a sample. Edit the text to suit your needs, just be certain to not touch the tokens - the items insde { }.
Time to create an email!