Drupal 101: Working with your web site (Drupal 6)
Drupal is a sophisticated software system for running web sites that is widely used and has won several awards for best Content Management System (CMS). With Drupal, you can maintain and update web sites without any html or coding knowledge (although it's extremely helpful and almost necessary for the installation and customization of your theme).
However, using Drupal can take some getting used to. We've created this site to help show you how to maintain your site.
Drupal provides these advantages to users:
- Pages can be updated and formatted using a simple toolbar, with no knowledge of HTML code
- Content from MS Word pages can be pasted in with automatic translation of word formatting into web formatting
- Site search is automated
- There is a built-in calendar system (using the event or calendar modules)
- Both News and the Calendar can be published as RSS feeds, if desired
- A photo image manager automatically adjusts photo sizes on uploads, and manages a library of uploaded images
- New users can be created and given limited power over the site.
- There is a built-in blogging system
- There is a built-in discussion forum system
- There are new features being added all the time.
What is Drupal?
Drupal is a Content Management System (CMS) that allows you to make changes and additions to your web site via your browser.
No html knowledge is necessary, as included with this software is a WYSIWYG (What You See Is What You Get) html editor, which works much like Word or other word processing software.
Want additional functionality?
Want to be able to do more with your site? Functionality is added to a Drupal system through the installation of "modules". There are dozens of add-ons for Drupal, and only a few come with a basic install of Drupal.
You can look at the entire listing of additional modules here and additional themes here; however, you will only be able to sort by which version of Drupal they work with if you register on their site.
Looking for more topics?
Looking for a topic that isn't here? Email Jenni with the details on the topic you are looking for and maybe it will become part of this guide.
Much of what is in this guide is in response to questions we regularly get from clients and friends. As such, this guide is a work in progress and will have updates as needed.
Important Information
Some items you should take note of before you start working on your site...
1. Content is stored in "Nodes", not HTML pages.
Drupal works by keeping all the content you specify in a database, where it is indexed and categorized. Web pages are created by retrieving sets of data, called "Nodes" and displaying them in some defined format. It is fairly easy in Drupal to completely change how information is displayed without having to regenerate the basic content. Because it works by displaying Nodes in Formats, there are no ".html" pages like there are in a traditional static web site. Instead you simply call up a node. Nodes can have names as well that are aliases for the node. So calling up this url displays the Getting Started page:
http://www.forwardsupport.com/node/40
and so does this one:
http://www.forwardsupport.com/tech_guides/drupal_101/how_do_i_get_started
Drupal makes it easy to have pages that display the content of a single node, like an ordinary web page, or that display specific data, like Title and Teaser, from all the nodes of a particular type.
2. You have some choices about how you create the HTML code on your pages.
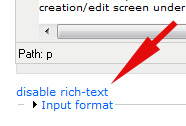
Whenever you have an area to enter some text, Drupal displays some input choices just below it:
The first choices is "disable rich-text" (or "enable rich-text"). This turns automatic HTML generation on and off. If you are in rich-text mode (the link says "disable rich-text") then you content is displayed just like it will look on the finished page, and you get a WORD-like toolbar over the text that you can use to apply formatting, insert images, etc.
If you are NOT in rich-text mode (the link says "enable rich-text"), then the box where you enter content shows you the actual raw HTML code, and you can edit it the old-fashioned way if you need to.
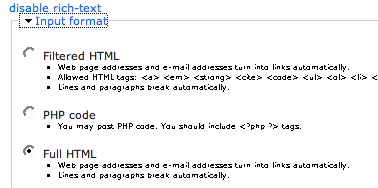
You also can click on the button for "Input Format" and choose how much automation you want on the content you enter. The editor will strip out content you put in that does not match the format. That is, if you select "Filtered HTML" and you type in anything beyond simple items like bold and italic, it will throw out that code. So if you discover that you're not getting what you expected after entering some HTML code, check your input format setting to see if that's the problem. PHP Code may not show for you, as faulty PHP coding can break your site.
This WYSIWIG editor likes to "eat" certain kinds of code. This includes forms, Paypal donation forms, image maps, and css.
If you frequently need to enter raw html code, you can set your personal settings so that your WYSIWYG editor is turned off by default. (Under My Acount). This stops you from accidentally breaking code on your site. You can still easily turn on the editor by clicking the "enable rich-text" link under the Body text area.
3. The WYSYWIG Editor Bar
Drupal gives you an easy-to-use tool bar to add bold, underline, links, images, etc. It shows up on all content creation/edit pages, as well as block edit/creation pages.
Most of the tools are obvious. The "chain link" is used to create a link on selected text or graphic. The broken chain removes the link. The little tree is used to insert an image. One other extremely important tool is the "Paste From Word" tool, a little clipboard with a flying W on it.
Microsoft WORD creates text that introduces numerous problems in an HTML page. It tends to retain a lot of formatting commands from WORD that do not translate well or at all to the web. It also retains what are called "high-order characters" - characters outside the normal character set that the web generally work with. Examples of this are n-dashes, curly quotes, curly apostrophes, ellipses. If copy text that contains these kinds of characters and just paste it into the content box, the page is likely to be displayed with question marks or black diamonds or fractions in it, at least for some users. These are the high-order characters being mis-rendered.
It will also copy in all settings from Word, including font type and size, margins from your page, etc. This will cause your text to differ from the standards set for the site regarding these settings.
You can prevent this by simply clicking on the Paste from Word tool, paste the content into the resulting window, and the click Insert to place it into your page. The Drupal editor will clean out all the problem on the way. It's wonderful!
4. Uploads are stored in the files directory
Each site has a files directory. The url into the files directory is typically in one of two places:
http://www.yourdomain.com/files
or
http://www.yourdomains.com/sites/default/files
You can set where your files will be stored in your administer menu (Site Configuration >> File System).
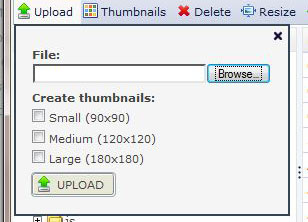
If you upload a document or graphic as an "attachment" to a page, that's where it will go. If you upload a graphic using the image gallery, it does into files/images. You need to know this to reference the document or graphic properly in other places. After you've uploaded something as an attachment to a page, it shows you the url for the attachment right below the attachment box.
I find the easiest way to keep track of files and images is to always upload them through the WYSIWYG bar. I use TinyMCE and IMCE together to enable me to do this. Then I am easily able to upload and link to files and images.
To make this work to the best of its ability, make your settings for IMCE use the main images directory as its default directory for all roles. And enable subdirectories. Then you can move within the various directories within the files directory.
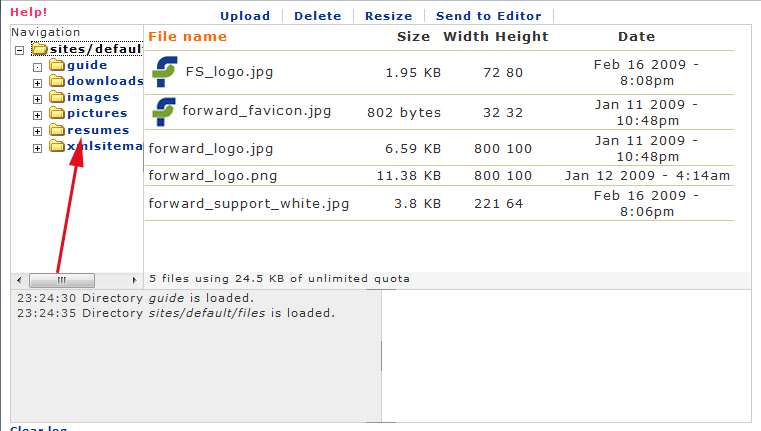
(Click for larger image)
What are nodes?
You'll notice that throughout your Drupal installation, and these tips, that the word "node" is used a lot.
With Content Management Systems (CMS) like Drupal, nodes are the actual content within the site. They can be pages, events, forum postings, and more.
Drupal and its modules come with several node types - web page, book page, event, forum topic, and blog included.
Advanced users can also create their own node types.
A "teaser" is a shorter version of the full node. When a block for a teaser is available on the node creation page, it allows the user to have full control over the content of the teaser. This is often a synopsis of the page or the first few lines/paragraphs copied from the body.
Teasers are not available by default. You either need a module that creates them, or one needs to be added via the Content Creation Kit (cck). This is also an advanced task, as it requires setting up and customizing several modules.
How do I get started
These help pages are designed to help you convert the basic installed site into a site tailored for you. The instructions here are very basic. Drupal is capable of much much more, and as you get familiar with the system and see what others have done, you may want to explore new features on your web site.
Please review the topics in this getting started guide first.
Start with the items:
If you have questions, please post them in the forums here, and if you have gained some experience, please watch the forums here to help out those following you.
More help:
- You can get help from Forward Support. They work on Drupal professionally.
- The Drupal Cookbook at the official Drupal site
- Try googling "Getting Started with Drupal" for several informative sites
- There are several books at various levels of technicality. See Amazon.com
Logging in to your site
Go to your web site and look for the log-in block/link in the left-hand side block. It should look like this:
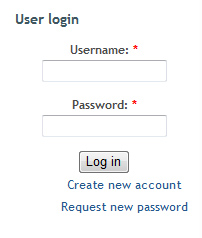
If your site does not allow people to create user accounts, the log in box may be hidden. In that case, go to www.yourdomainhere.com/user. The /user page functions as the log in page when you aren't logged in and your account page when you are logged into the site.
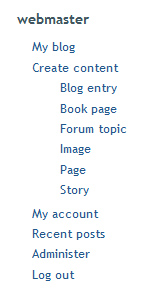
You can tell when you're logged in because a menu (the navigation menu) should show up that has the create content link, administration menu (if you have access to the admin area), etc. The title of the menu will be your user name.
Your login status is "remembered" on your computer, so when you return to the site, you may still be logged in. To log out, click on the"log out" entry at the bottom of the navigation menu.
Navigation Menu
All the control you need to create new web pages, upload images, set up forums, is available in the Administrator Menu, which appears in the Navigation Menu when you're logged in. This is the menu that is titled by your username. If the Admin Menu module is installed, youll also find the Admin Menu at the top of your page when you're logged in. It looks like this:
![]()
(click on image for a view of the entire menu)
With Drupal, you don't need to know HTML code and you don't need to know how to ftp content up to your site. It does everything through simple forms you fill out.
The first couple times you use Drupal, navigating it can be a bit difficult. That's especially true if you've never built a web site before or have only done them through html coding (either by hand or using software like Front Page or Dreamweaver) and uploading by FTP.
With Drupal, FTP access is rarely needed. Times you would need FTP access include things like initial set up, module upgrades and changes, and changing the theme. Everything else is done in your browser.
When you create HTML code in a page, you use a simple WORD-like toolbar that lets you apply styles, make lists, add links, create tables, and more. You see the results of your changes on the page, not the code behind it. (Note: the WYSIWYG (What You See Is What You Get) editor does not work correctly with Mac Safari. So if you are on a Mac, you'll want to use Firefox instead.)
![]()
(Click for larger image)
Note: Your WYSIWYG bar may look different than the one shown above. There are a variety of options available, which can be set by the site webmaster by editing the TinyMCE settings.
First, you'll need to be logged into your web site in order to do anything. So log on with the information that has been provided to you.
Now you can begin work on your site.
Common Questions
Chances are, your first couple of questions are:
- How do I change the banner?
- How do I change the front page?
- How do I change the name of the site (as shown in the top left-hand corner of your browser)?
- How do I change the footer
- How do I change the e-mail address that the site sends out e-mails from?
- How do I change what is shown in the side columns?
Using the links above you can find more detailed information on those questions.
How do I navigate my site? Where do I go? What do I do?
Chances are you're going to be using two links from your Navigation Menu more often than anything else: Create Content and Administer.
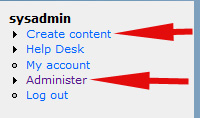
Create Content
This is where you go if you want to add content to your site. From here you can add pages, books (different from a page in that you can create child pages that automatically link to each other and the parent page), events, etc.
Administer
This is where you control how your site looks and operates, as well as view the logs.
Note: If you see a red box that appears at the top of your page that looks like the following, click on the "status report" link. This will tell you what you need to do. It could be that your modules have an upgrade available, that you haven't run the cron file in a while, etc.
![]()
There are six sections under Administer. They are listed below with the most common actions you'd take under each.
When working with items listed as Advanced, you should take caution. Changing these items can drastically change the way your site works. You may want additional help before changing any of these options. As such, these options may only be available to the sysadmin for your site.
Some of the itema listed below, such as image galleries and content templates, are contributed modules that will only be available if you add them to your Drupal installation.
Content management
This is where you can:
- See a listing of everything on the site- Content
- Change how content behaves, such as whether it automatically
promotesto the front page, are comments allowed, etc. - Content Types - How comments are handled, including dealing with those in moderation - Comments
- Creat forums - Forums
- Create image galleries - Image Galleries
- Pull in a rss feed from elsewhere - News aggregator
Advanced options: These can include Content Templates and the tabs that show up on the Content Types page.
Site building
This is where you can:
- Change what shows up in the sidebars - Blocks
- Change your menus, including the drop-down menu at the top - Menu
- Change aspects of your theme, such as whether the Slogan shows up, whether who submitted an item shows up under the page title, etc. - Themes
- Change the URL alias for pages, or add additional ones to pages - URL aliases
Advanced options: Views, Modules
Site Configuration
Almost all the options on this part would fall under Advanced. The one you'll use the most is Site Information, which is explained here.
User Management
This allows you to:
- Create new users and see which users are already on your site - Users
- Change whether registration is allowed, closed, or if new users have to be approved - User Settings
Advanced options: Access Control, Access Rules, Roles
Logs
Here you can see what errors people are getting, what are the most viewed pages, etc.
These logs are simple logs.
Help
Here you can find some information on how to work with your site.
Changing site information
Chances are, your first couple of questions are:
- How do I change the banner?
- How do I change the front page?
- How do I change the name of the site (as shown in the top left-hand corner of your browser)?
- How do I change the footer
- How do I change the e-mail address that the site sends out e-mails from?
- How do I change what is shown in the side columns?
Using the links above you can find more detailed information on those questions.
There are several bits of information that can be changed on the Site Information page under administer (/admin/settings/site-information).
Included in that are:
- Site Name (that's what shows at the top left-hand corner of your browser)
- Main e-mail address (any e-mails that go out from the site, such as log-in information, will show this address)
- Slogan
- Mission
- Footer
- Default front page
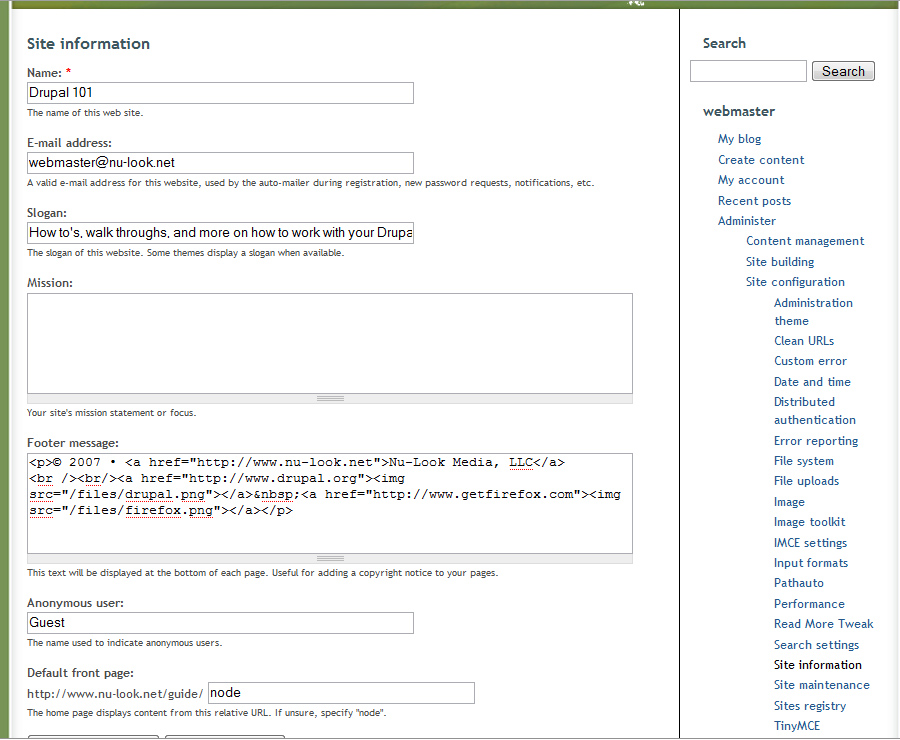
(Click for larger image)
The main pieces on this page you're going to use are the Site Name, E-mail address, Footer, and Default front page.
Site Name
This is what shows up in the left hand corner of your web browser. It is the text to the right of the |. The text to the left of the | is the name of the page you're on.
Page Title | Site Name
So if you're on the Site Information page at the Drupal 101 site, the text in the left-hand corner will say"
Site Information | Drupal 101
You can control what this says by changing the Site Name and the title of each page, event, etc.

E-mail address
Whenever an e-mail goes out from the site, such as that with log-in information for a site user, the e-mail address attached to that message can be set on this page.
Be sure it's an e-mail address that actually exists, because you may occasionally get responses or e-mails to that address.
Slogan & Mission
Slogan and Mission are rarely used in Drupal sites, and many themes do not use them. That means even if you input information (and turn them on via the Theme configuration page - /admin/build/themes), they may not show up. How they look and where they appear are controlled entirely by the site's theme.
The Slogan can also show up on your front page in the upper left-hand corner of your web browser.
Footer
More information on the footer, including how to use it, can be found here.
Default front page
More information on the front page options can be found here.
Changing your banner
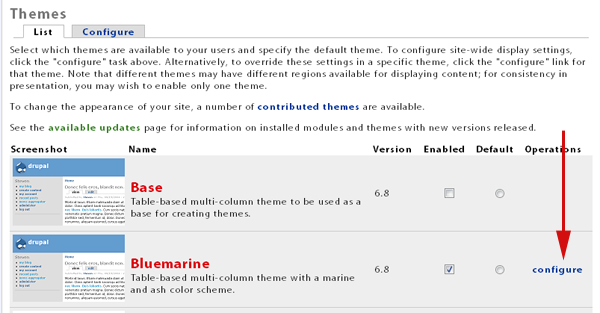
Want to change the banner on your county's site?
- Log in.
- Go to the admin menu, then click on Themes.
- To the right of your theme's name, click on Configure.

(Click for larger version) - On that page you can upload a banner (logo) as well as a shortcut icon (also known as favicon).

(Click for larger image) - Submit your changes.
- Refresh your browser to show the changes. You may need to clear your browser's cache.

Note: When you upload the banner, it will change the filename to themename_logo.FILETYPE. This will be stored in your site's files folder. File type could be .jpg, .gif, etc.
The shortcut icon is that little graphic that shows on tabs in Firefox, IE, etc.

How do I create a banner?
To create a banner for your web site, you are going to need access to a graphic design program, such as Photoshop, Photoshop Elements, Paint Shop Pro, etc.
In that program, create an image to fit in the banner space.
Once you've created it and saved it as a jpg, png or gif.
Then you can follow the steps listed above to upload your banner.
If you've never created graphics like this before, you may want to find a volunteer or designer who can do it for you.
Changing the front page
A question that comes up a lot is how to change your front page. People are looking for something called index or index.htm, since that is how they've controlled the front page in their sites previously.
Drupal does not work that way. There is not an "index" page, and no pages have .htm or .html after them. They don't have a .anything at all. Page names are things like:
/home
/events
/2007/05/28/act_blue_contributions_now_available
The one thing you should know is that you shouldn't put any spaces in web site names (otherwise known as URL aliases or a URL path). Instead, use the underscore so that all web browsers and e-mail programs handle the links properly.
Ok, so now what do I do?
So now that you know there isn't an index page, how do you change your front page? You actually have two options:
- A front page that only houses one node.
- A front page that houses "teasers" to a variety of different nodes.
I'll now go over the differences, an example of each, and how to do it.
A front page that only houses one node
You would use this if you want to have a traditional front page. This may be using tables, if you'd like, to create a front page. This means your front page probably doesn't change that often -- it's more likely to be very little lengthy text (maybe a welcome) with links off to other content.
An example would be our web site, http://www.forwardsupport.com
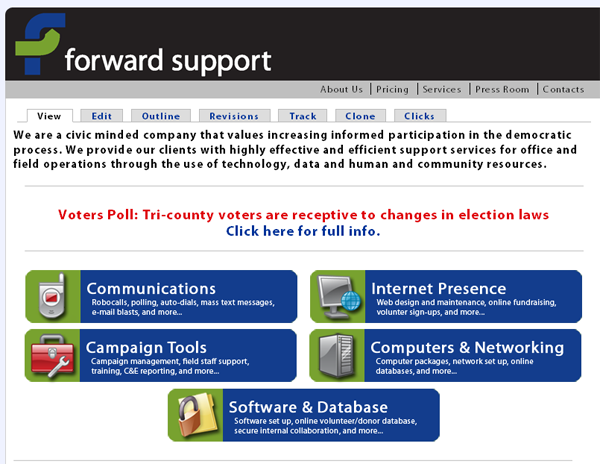
(Click for larger image)
The center portion of the front page is a node that uses tables. You'll notice that when I am logged in, I get tabs above the main portion of the site (view, edit, outline, etc.). To change the content on the front page, I just click the "Edit" tab.
The front page of the DPO's web site also used this type of front page before going to a more advanced option (block regions).
To create this kind of front page, first create your page. Be sure to set the URL path to something obvious like "home" (or even "index," if you'd like). I use "home" because it works well with search engines.
Then go to the "Site Information" page, which is located under your administer menu.
Scroll down to the bottom of that page. There you'll find a setting for the default front page. Change "node" to whatever you used as the URL path for your page:

Hit "Save Configuration."
This will now change your front page.
A front page that houses "teasers" to a variety of different nodes
Your second option is a page that changes whenever you "promote" an item to the front page.
An example of this type of site is Blog for Oregon.

(Click for larger image)
The address to this page is /node.
You'll notice this page has two nodes visible on the front page (there are 10 in total). These nodes show up on the front page because they have been "promoted" to the front page.
Obviously more than 10 nodes have been promoted to the front page in the year+ that the site has been online. You can get to older items via links at the bottom of the front page:
![]()
There's also an icon (the orange one on the left) that gives site visitors access to the RSS feed for your site.
Any time you add an event, blog entry, page, etc., you can have it be "promoted" to the front page. If you don't have teasers set up on your site, it will automatically pull the first 600 characters (you can change this on your administer menu: /admin/content/node-settings).
You can also control what is pulled as the "teaser" by using a comment that tells it where to break. That comment is: <!--break-->
A comment is a piece of text that does not show up on the page (but can be seen in the html). Typical uses are for documentation.
If you insert that text where you want the teaser to end, it will use that instead of the first 600 characters.
Note: You must add that comment when the rich-text editor is off. This means clicking on "disable rich-text" under the text area.Otherwise the editor just sees the comment as text.
Items will be added to your front page in date order, newest first. Any item that has been set as "sticky" will be placed at the top of the page, regardless of age.
You'll find the "promote to front page" and "set as sticky" options at the bottom of your page creation/edit screen under "Publishing options."
What is this other stuff that is showing up on my front page?
If you have other text that is showing up in the "main" section on your front page, check your Site Information page. If you've set a Slogan or Mission, these can show up on the front page as well. You can either delete the text, or on the Configuration tab on the Theme page (/admin/build/themes), you can turn them off.
The footer on that page controls the text that shows up at the bottom of the page.
Changing the footer
To change the footer, go to the Site Information page from the administer menu (/admin/settings/site-information).
There you can change what text is put in the footer.
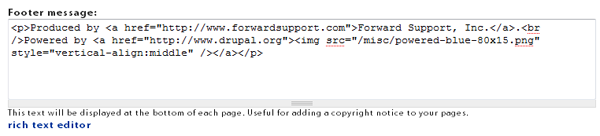
You will need to use paragraph breaks and line breaks in order to put text on separate lines.
If you want text directly on the next line, use <br /> at the end of the previous line.
Example:
<p>Line one's text here. <br />
Line two's text here. </p>Looks like this:
Line one's text here.
Line two's text here.
If you want text to skip a line, which is in effect creating a new paragraph, use the paragraph coding. If has an opening piece of code and an ending piece of code. This is different than the line break, which only has one piece of code.
Example:
<p>Paragraph one here.</p>
<p>Paragraph two here.</p>
Looks like this:
Paragraph one here.
Paragraph two here.
Failure to use the line or paragaph breaks will cause your footer text to run together on one line (or multiple lines if there is too much text to fit on one line).
Understanding Your Drupal page
Pages in Drupal are typically set up in the common three column with header layout:
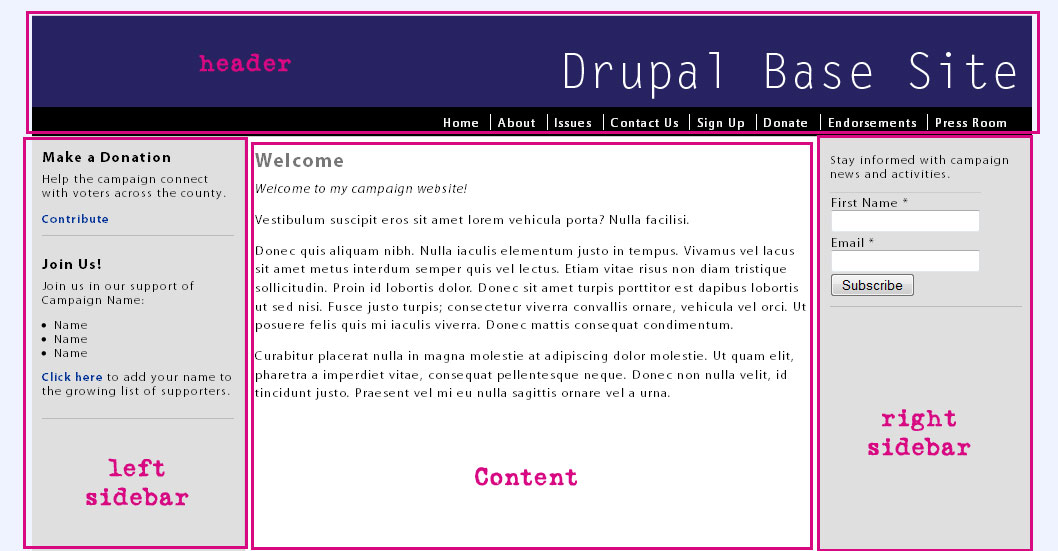
(click for larger image)
The way you edit the content in these regions varies according to what region you are working with.
The header and two sidebars are edited on the blocks admin page. You can add as many blocks to these areas as you'd like. The order is easily changed, as you can drag the blocks into the correct order and then save the page. Read more about the sidebars here.
The menu that I have in the above example is the "primary links" menu. You'll find that on the menu admin page. There you can edit which links show in the menu. You then add the menu's to the header region (or other region) on the block admin page. Read more about menus here.
The banner graphic (that says "Drupal base site") is edited as part of the theme. This is a graphic that was created in a graphics editor and then added to the site. Where it goes and how much room is allocated to it varies from theme to theme. You change this on the theme's configuration page. You can read more about changing your banner here.
The main content area is where the content of your page goes. So when you create a "node", the body of the node goes there. Depending on the settings for your content type, settings for your theme and its stylesheet, you may also see the title, date of its post, author, etc.
Some themes also include regions for before content and after content. These would show up in the middle of the example above, before or after that welcome text. You add items to that area via the block admin page.
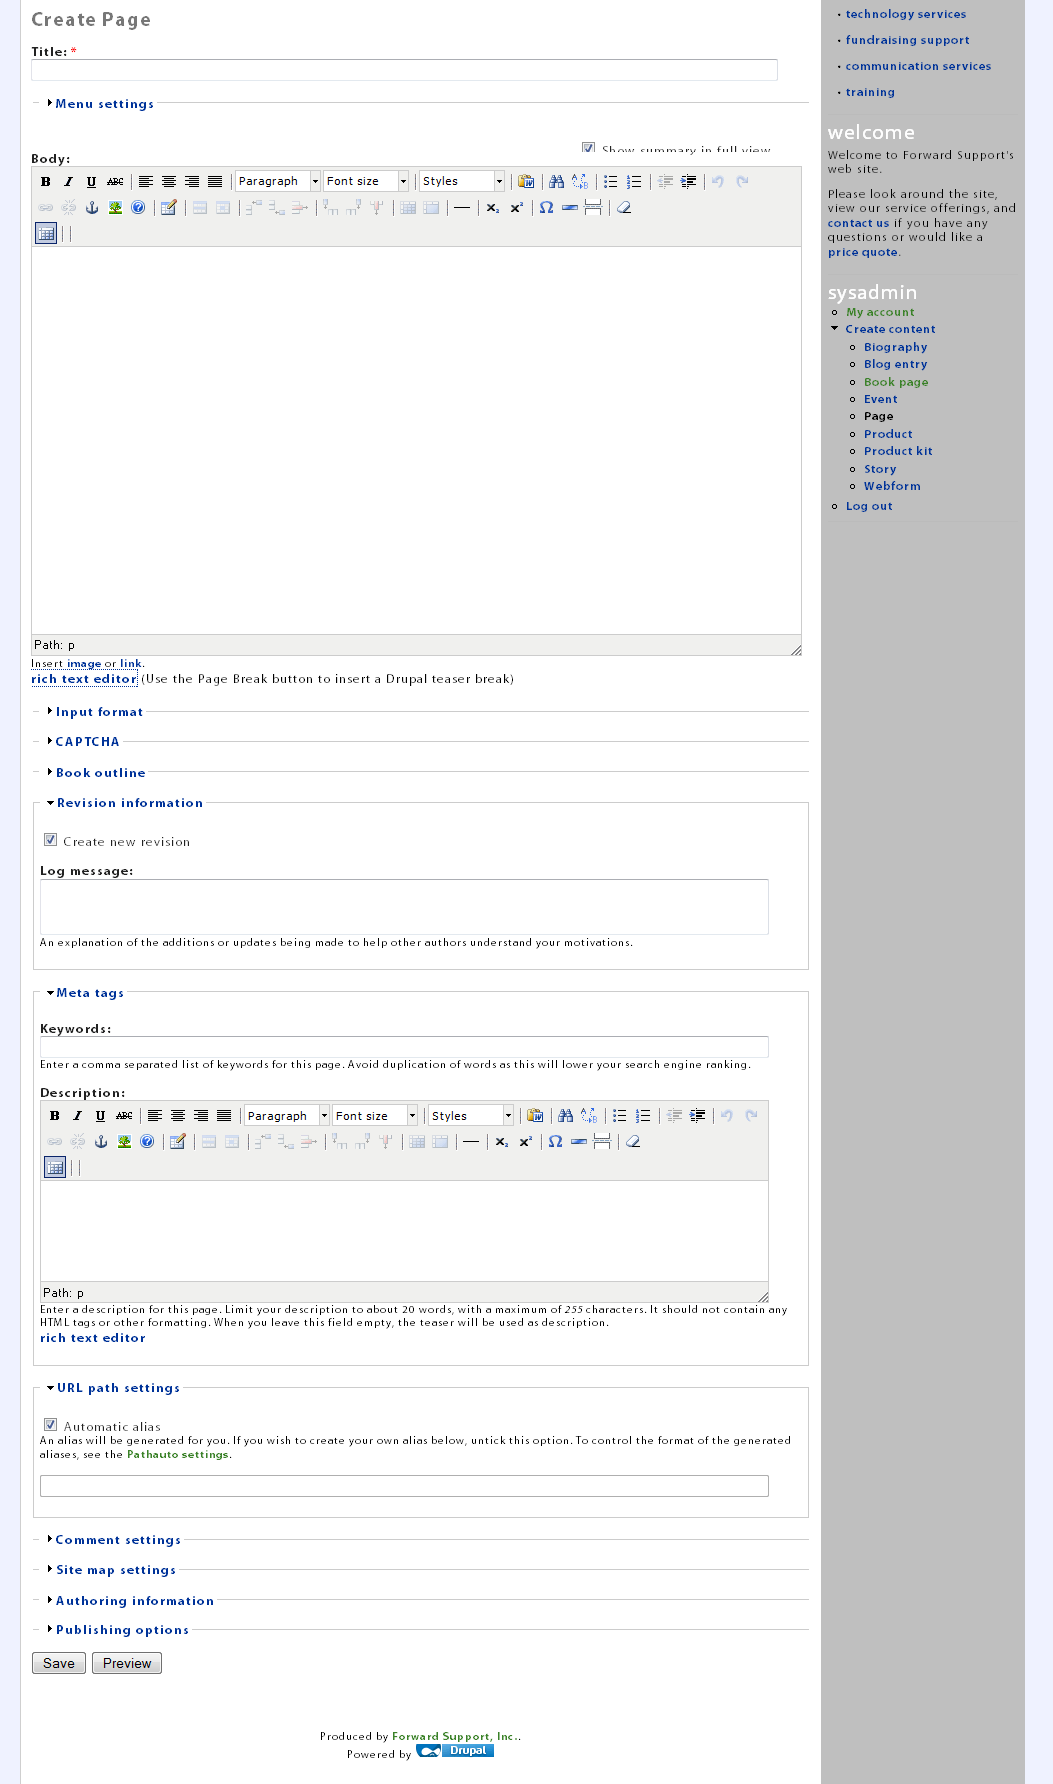
Adding content

Add content page
When you click on the link to add a piece of content to your site, you will receive a page that asks for Title, Body, and other information.
Depending on your site, there may be additional information that can be entered, such as a Teaser or other custom fields.
A rich-text, or WYSIWYG, editor is available on multi-line fields such as Teaser and Body. This allows you to easily add bold, italics, links, and more.
Once you enter the information into the fields and hit Submit, your content will be added to the site.
Editing a page
Editing a page is very similar to how pages are added.
First, make sure you're logged in - only those with the appropriate permissions can edit content.
Next, go to the page you want to edit. On this page you should see a series of tabs. The number and type of tabs available varies according to modules installed. But as long as you have the correct permissions, you should at least see two tabs - View and Edit.

(click on image to see larger view)
Once you click on the Edit link, you'll get a page that looks just like the content creation page - and works the exact same way - except your content is already there.

Adding images and files
Adding an image or file to your site is easy with the WYSIWYG editor. Both work almost exactly the same, as it is controlled by the same module.
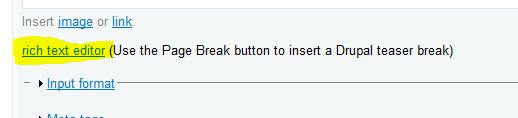
Turn on your editor (if necessary)
Some sites have the rich text editor disabled by default. If so, you will need to turn it on. Click on "rich text editor" under the text area you're working with (highlighted below in yellow). The exact wording may vary depending on which WYSIWYG editor is turned on for your site.
TinyMCE
The following instructions are for the TinyMCE editor. Buttons may vary depending on how yours is configured.
Adding an image
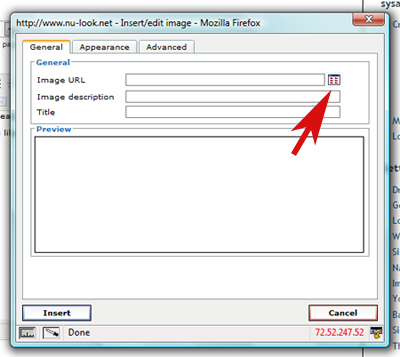
First, click on the icon that looks like a little tree.

This will pop up a window (see below). Click on the icon that looks like a file directory.
This will pop up another window where you can upload files.
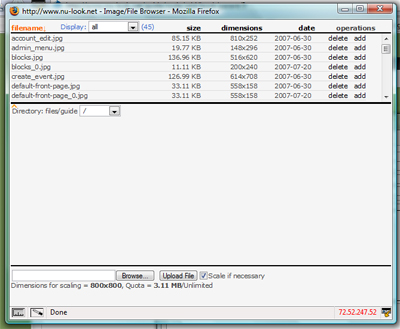
(click for full sized image)
You can browse and upload additional files, or you can select a file that has already been uploaded.
If you'd like to organize your files into folders, you can create the folders via FTP and then use the drop down box under the file listing to select which folder you want to work with.
You can select the image you want either by clicking on add to the right of its name or clicking on the image's name and then clicking on the image when it pops up in that blank area in the box above.
You'll then be taken back to the first pop up window.
You have to input an image description. It's good to input a good, short description since Google and other search engines do pay attention to those.
If you want to align the image to the left/right or anything like that, click on the Appearance tab.

(click for full sized view)
Once you're finished, hit Insert and the image will be added to your page.
Adding a file
Adding a file works almost exactly like adding an image, except you'll need to highlight the text to be linked first, and then click on the button that looks like a link in a chain.

The rest works pretty much the same way - a window will pop up. Click on the directory button.
Browse and upload your file.
Click add to the right of the file's name to add it to your page.
You'll be taken back to the first pop up window. Here you can either hit Insert to finishing adding the link, or use advanced options like forcing the link to open in a new window (helpful if you're linking to a page outside of your own site).
CKEditor
The following instructions are for the CKEditor editor. Buttons may vary depending on how yours is configured.
CKEditor works very much like TinyMCE above, its buttons and pop-up are just a little different.
Highlight the text you want linked to the file. Then click on the button that looks like a globe with some chain in front of it:
When you click on this, a pop-up window will appear. Here you can either choose to upload a new file, link to a file already available, or link to a URL by pasting it into a text box:

Under the "target" tab you can also choose to have links open up in a way other than in the current browser window. For instance, if you want something to open in a new browser window (or tab), you'd choose New Window from the list of options on that tab.
By clicking on "Browser Server", you will be taken to another pop-up window that shows all files in your files directory as well as the ability to add new ones.
The pop-up you receive will look something like this:
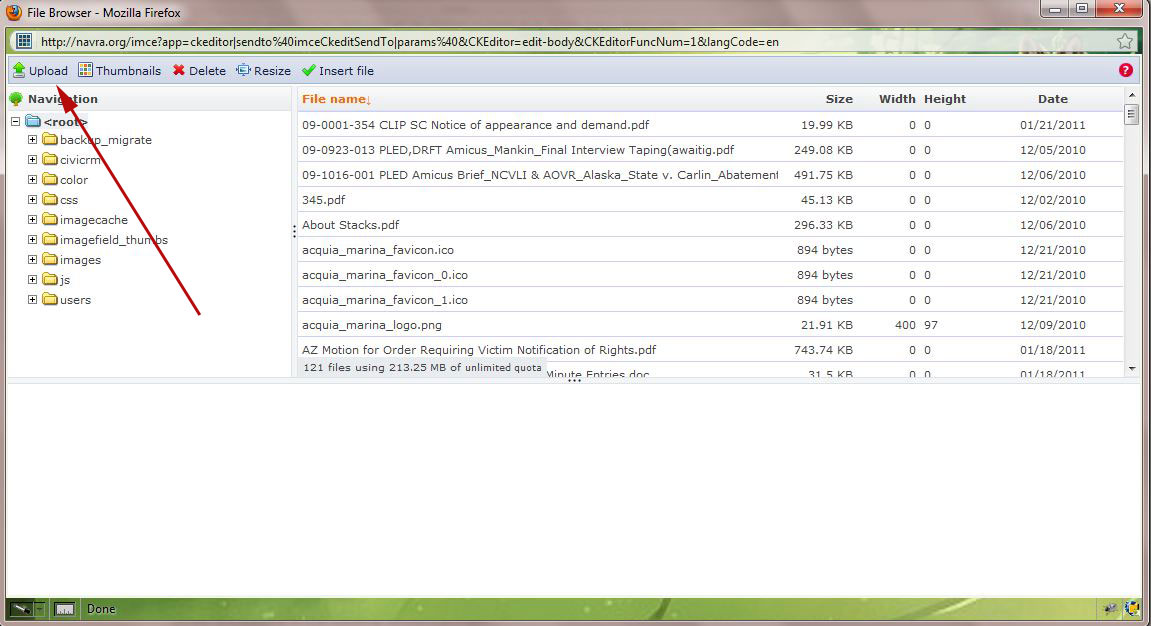
(Click for larger version)
If the file you need is already there, double clicking on its name will select it and take you back to the previous pop-up. You can hit "Ok" to close the window and add the link to the text or add additional options on the "Target" and "Advanced" tabs.
To add a new file, click on "Upload" in the top left corner of the pop-up. This will bring up an area to upload new files:
When you choose browse, you'll be taken to a file selection window where you can choose the file to upload.
Once it is uploaded, you'll go back to the file listing.
Double clicking on the file's name in the listing will select it and take you back to the previous pop-up. You can hit "Ok" to close the window and add the link to the text or add additional options on the "Target" and "Advanced" tabs.
This file will now be linked to the text (or image) you selected at the beginning of this excercise.
Changing the side columns
The columns on either side of the main body of the site are called sidebars. There is a left sidebar and a right sidebar.
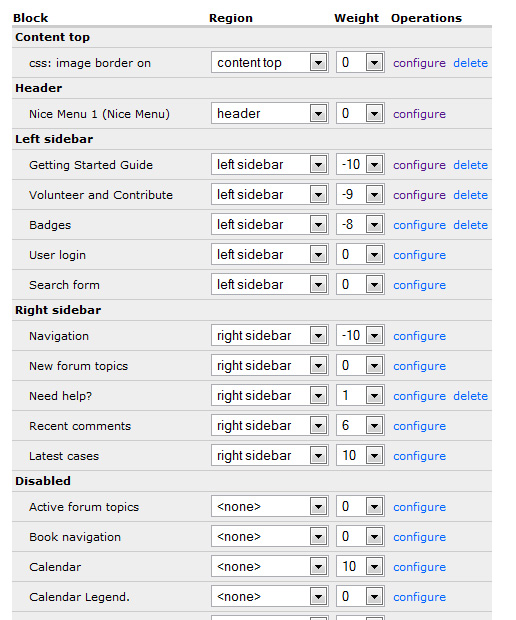
All of the information in the two sidebars are "blocks." You can access the blocks under the administer menu (/admin/build/block).
You can control where the blocks will show. Most often you're going to use the left or right sidebars.
You can also control in what order the blocks show up in based on their weight -- smaller items float to the top.
You can use the blocks already created for you (such as search, log-in, etc.), or you can create ones of your own.
Choosing when/where the blocks show up
You can also control when/where the blocks will show up. This is handy for when you want an item to show up only on specific pages, such as a table of contents for your monthly newsletter.
Click configure next to the block you want to edit, Scroll down. Towards the bottom are "Page specific visibility settings" where you can choose when and where the block shows up.
Drupal 5 screenshot Drupal 6 screenshot

(Click each for larger image)
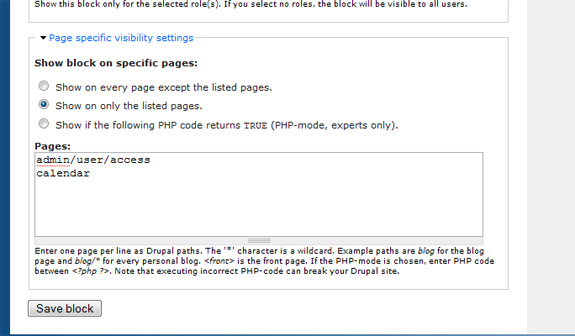
Save the block.
Menus
The menu admin page can be found under the "Site Building" admin area.
When you go to the page for configuring your menus, you will see a listing of the menus available plus tabs for creating new menus and the settings for the menu.
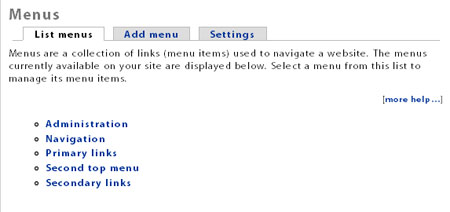
Sites typically come standard with these menus: Navigation, Primary links, and Secondary links.
Navigation is the menu that shows in the sidebar and is titled by your username. Read about the Nav menu here.
Primary links is the menu most often used in the banner area.
Secondary links can either be a completely different menu or you can assign to it the same items as the Primary links menu. This allows you to show child items of the Primary links. You can read more about this on Drupal.org (opens in a new window).
You can edit and add to your menu system from here:
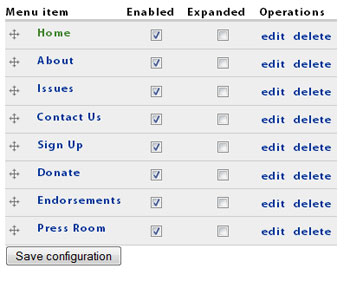
As you can see, you can easily disable or rearrange items for any menu.
Links and Link Anchors
Adding a link
Adding a link to your page is simple.
Highlight the text to be linked. You have to do this, otherwise the link button will not be accessible.
Inside the WYSIWYG editor, click on the button that looks like a chain link.

This will pop up a new window.
Click on the button that looks like a small directory.
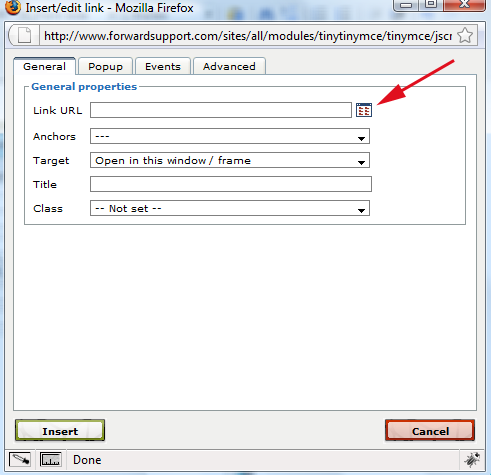
This will bring up a file browser will all the files saved in your files directory. You can choose to link one already there or upload a new one.
Click on the file name you want to link. It will pop up in the box in the lower right corner. If it is a graphic, you will see the graphic. Otherwise, you will see the file name. Click on it.
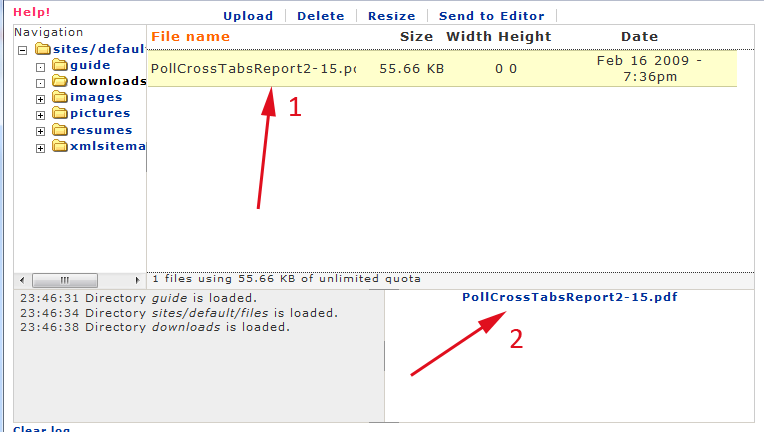
You will then be taken back to the first pop up window. Hit Insert to add the link.
If you want to have the link open in a new window (such as for an external link), choose the "Target" on the above step before hitting Insert.
What is a link anchor?
An anchor allows you to link to content within the same page. This is regularly used on items such as newsletters, which have a Table of Contents at the top of the page that then link to items further down the page.
It can also be used to link to that portion of the page from another page on the web site. However, doing so is a bit more difficult since you won't have access to a drop down listing of anchors.
Creating an anchor within your page
Click next to the area you want to link to. This could be at the beginning of the title for that page. You do not need to highlight anything.
Click on the anchor in the WYSIWYG editor. This brings a pop-up window.

Name your anchor. Keep it short, without any spaces.
Hit insert.
This adds the anchor to that spot on your page.
Go to where you want to link from, such as your Table of Contents. Highlight the text you want to link, and then hit the chain icon in your WYSIWYG editor.
Put in the page name that you're currently on as the Link URL. This is very important, otherwise the anchor will not work. If you don't know the URL for the page you're working on, "Submit" the page and then edit it. This will allow you to see the node/# address to the page. If you've set a URL path for the page (such as "home," "about_us," etc.), that is the Link URL for that page.
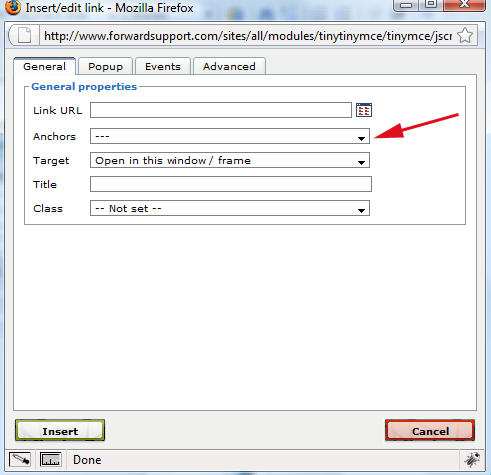
On the Anchors drop down, choose which anchor you want to use. It will only show you anchors on the current page.
Hit insert.
Now you have linked that text to the section further down the page.
Linking from one page to an anchor on the other page
Doing this is more difficult than linking within the page, as you will not have the drop down listing of anchors to choose from.
Set up your anchors on the page as shown in the above example. I recommend writing down the names of all your anchors so you'll remember their exact name. You'll need this for when you create the links on your other page. Also write down the URL for the page these links are on (such as http://www.forwardsupport.com/tech_guides/drupal_101/how_do_i_get_started or http://www.forwardsupport.com/node/40).
Once your anchors are in place, submit the page. Then go to the page where you want to create the links. Hit edit.
Go to where you need to put the link. Highlight the text and click the link (chain link) icon.
For the Link URL, type in the address to the page you're linking to (tech_guides/drupal_101/how_do_i_get_started, node/40, etc.) and then a # sign and then the anchor name.
Example:
http://www.forwardsupport.com/node/40#anchorname
Hit Insert.
This will link the text to an anchor on another page.
How to use the blog
Many people want to blog on their site. This is easy to do since a blog comes standard within Drupal.
The blog can be a single or multi use blog. Anyone with the appropriate permissions can post a blog.
The blog is located at /blog on your site. This page shows every blog posting that is on your site, 10 per page.
Each user also has their own blog. If pathauto has been turned on for your site, each user's blog is located at /blogs/username
The blog is pretty simple. If you want it to have advanced features like a month-by-month archive, links to places like Reddit and Facebook, etc., additional modules will need to be installed and customizations made.
Adding a blog is as simple as clicking on the "create content" link in the Navigation Menu and click on "Blog entry."
Add you content and submit the page.
You've now added an item to your blog.
What is a book?
A book is a piece of content that can have child pages added to it.
Automatic links are added to the pages, giving forward/next and up links that easily move you through the book. All child pages are automatically linked to the parent page.
This Drupal guide is set up using a book. You can see the automatic links that are added on the front page (shows all the sections of the guide) and the back/next links below on every child page.
How to use contact forms
Many people have started using contact forms instead of placing email addresses on a web site. This allows you to help limit the amount of spam you get, as automated scripts scan through the net looking for email addresses to spam. These forms do not show your email address and can have a Captcha added to them to further prevent spam (the captcha may have people put in the characters they see, type in the fourth word out of a row of words, etc. depending on your setting).
Here's how to add that form to your site.
Go to the modules listing and turn on the contact module and then submit the page.
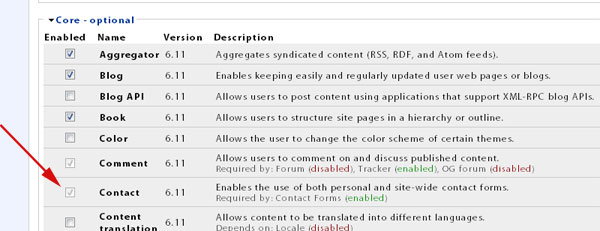
Go to your administration menu and under "Site building" select "Contact form."
If this does not show up on your menu, you may need to check the user permissions (» Administer, » User Management, » Permissions). Only the "super user" (the person who uses the user/1 login) automatically gets the permissions for new modules that are turned on - all other users will need their access turned on before they can administer or use the module. You should always check that page whenever you turn on a new module.
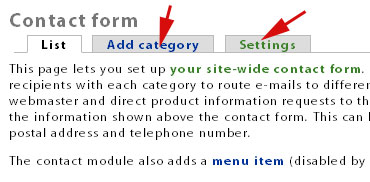
On this page you can "add category", which creates a new contact form. You can also click on "settings" to change the settings for this form. This includes the ability to add text at the top of the default contact form. This is often used so that on the default form you can have information like mailing address, phone, etc. and then the default contact form below.
You can see an example of a contact form with text added at the top here on our Contacts page.
Click on "Add category" to create a new contact form.
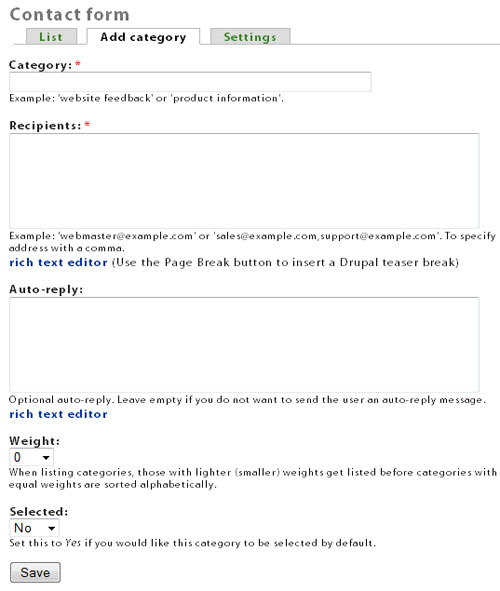
(click image for larger view)
On this page you will select who the recipient(s) for this form are, what the autoreply will be (I usually make sure it is obvious in the text that this is an autoreply so that people know), etc.
If you are only setting up one contact form, here is how I usually fill it out:
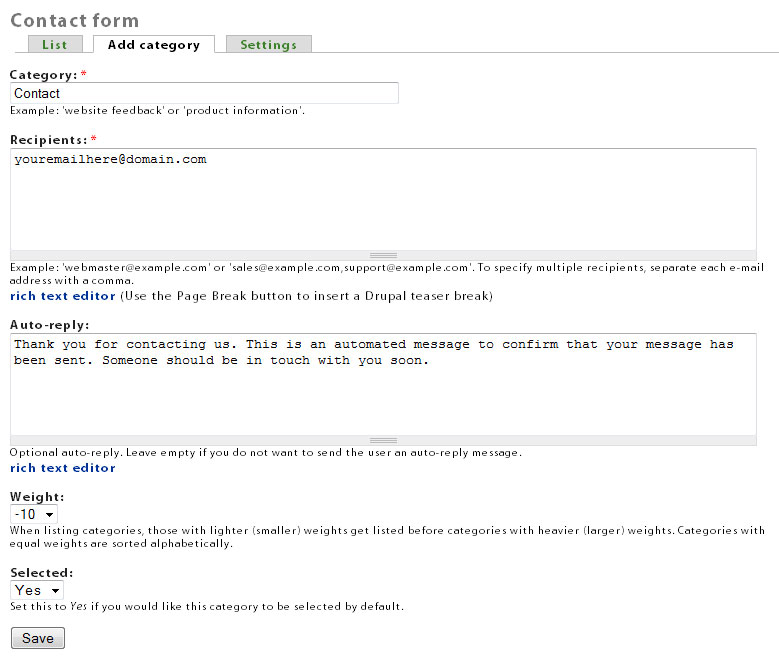
(click image for larger view)
Your contact form will not be available at www.yourdomain.com/contact
If you set up multiple forms, there will be a drop down box on the page where people can select the receipient of the message.
A better way to handle multiple contact forms can be found here.
How to handle multiple contact forms
For some people, just having the drop down on the contact form for people to be able to select the recipent is enough. For me, I like being able to have individual pages where people can be directed in order to send emails. This allows you to link to each person/dept's email page from a staff directory page, bio page, etc.
In order to do this, you will need to turn on the Contact Forms module. You will then need to ensure you have the proper permissions to be able to work with this module (» Administer, » User Management, » Permissions).
Create all your "categories" as explained on this page.
Now you just direct people to the appropriate page by using the path www.yourdomain.com/contact/{category}
Note: spaces in your "category" name will be replaced with underscores and all capitals become lowercase letters.
So, if you were setting up a contact form for me (Jenni Simonis), you would name the category Jenni Simonis. Then the address to get to my form would be www.yourdomain.com/contact/jenni_simonis. An example of a live contact page using this system can be found here. You can see that we link to all our contact forms here on our "About Us" page.